Crispy Cherry Crisp Recipe
There’s something undeniably joyful about homemade desserts, especially those that evoke nostalgia. The warm, inviting scent of a fruit crisp baking in the oven can transport you back to cherished memories of family gatherings and summer picnics. Among the many delightful options, Cherry Crisp stands out as a beloved classic, marrying the sweetness of ripe cherries with a crunchy, buttery topping. This Crispy Cherry Crisp recipe is not only a celebration of seasonal flavors but also an incredibly versatile dessert that can effortlessly elevate any occasion, from casual weeknight dinners to festive celebrations.
When you think of fruit crisps, the focus is often on the vibrant fruit filling, and for this recipe, we’re highlighting the sweet and slightly tart cherries. Whether you choose to use fresh cherries in the height of summer or opt for frozen cherries during the off-season, this dish promises a delightful balance of flavors. The combination of juicy cherries and a crispy topping creates a textural contrast that is simply irresistible.
Understanding the Ingredients
Key Ingredients for the Cherry Filling
The heart of any Cherry Crisp is, of course, the cherry filling. Here’s a closer look at the key ingredients that will help you achieve an exquisite flavor profile.
1. Fresh or Frozen Cherries: The choice between fresh and frozen cherries can significantly impact your dish. Fresh cherries, typically available in late spring and summer, offer a bright, juicy flavor that shines in this recipe. On the other hand, frozen cherries, which are often picked at their peak ripeness and flash-frozen, can be just as delicious and are available year-round. If using frozen cherries, remember to thaw and drain them to prevent excess moisture in your filling.
2. Sugar: Sugar is essential for balancing the natural tartness of cherries. The amount of sugar can be adjusted based on the sweetness of your cherries and personal preference. A combination of granulated sugar and brown sugar can add depth to the flavor, creating a more complex sweetness.
3. Lemon Juice and Extracts: Lemon juice is a crucial ingredient, adding acidity that enhances the flavor of the cherries. A splash of lemon juice brightens the filling and complements the fruit’s sweetness. Additionally, a hint of vanilla or almond extract can elevate the flavor profile, creating a more aromatic experience.
Key Ingredients for the Crispy Topping
The topping is what truly makes a cherry crisp stand out, and the texture is key. Here’s what you’ll need:
1. Oats and Flour: Rolled oats are a staple in crisp toppings. They provide a hearty texture and chewiness that contrasts beautifully with the soft cherry filling. All-purpose flour helps to bind the ingredients together and gives the topping a crumbly consistency. The right balance between oats and flour can create a topping that is both substantial and light.
2. Butter: Butter is essential for richness and flavor. When melted and mixed with the dry ingredients, it creates a luscious topping that browns beautifully in the oven. Using cold butter cut into cubes can also lead to a flakier texture, so be sure to experiment with temperatures based on your preference.
3. Optional Nuts: Adding nuts such as chopped almonds or walnuts can introduce an additional layer of crunch and offer nutritional benefits. Nuts are a great source of healthy fats, and their flavor complements the cherries beautifully, enhancing the overall dish.
Step-by-Step Instructions for the Cherry Crisp
Preheating the Oven
Before diving into the preparation, it’s essential to preheat your oven to 350°F (175°C). Proper preheating is crucial for optimal baking results, ensuring that your cherry crisp bakes evenly and the topping achieves the perfect golden-brown color.
Preparing the Cherry Filling
1. Mixing the Cherries: Start by washing and pitting the cherries if using fresh ones. If you’re using frozen cherries, ensure they are thawed and drained. In a large mixing bowl, combine the cherries with sugar, lemon juice, and any extracts you wish to use. Gently toss the ingredients together, making sure the cherries are evenly coated. This step is vital for achieving that perfect balance of sweet and tart flavors.
2. Adjusting Sweetness: Taste your mixture after combining the ingredients. Depending on the tartness of your cherries, you may want to adjust the amount of sugar. This is your chance to customize the filling to your liking, so don’t hesitate to experiment a bit.
3. Setting the Filling: Once the cherries are mixed and flavored to perfection, pour the cherry mixture into a greased baking dish. Spreading them out evenly will ensure that each bite is filled with the delicious fruit.
Making the Crispy Topping
1. Mixing the Dry Ingredients: In a separate mixing bowl, combine rolled oats, flour, brown sugar, and any optional nuts. Stir the ingredients until they are well mixed.
2. Incorporating the Butter: Add the cold, cubed butter to the dry mixture. Using a pastry cutter or your fingers, work the butter into the dry ingredients until the mixture resembles coarse crumbs. This process is vital for achieving that desired crumbly texture that will crisp up beautifully in the oven.
3. Final Assembly: Once your topping is ready, sprinkle it evenly over the cherry filling in the baking dish. Make sure to cover the cherries entirely, as this will help lock in moisture and create a beautiful crust.
With your oven preheated, cherry filling prepared, and crispy topping assembled, you are just moments away from enjoying a delightful dessert. This Crispy Cherry Crisp not only celebrates the flavors of summer but also brings a touch of warmth and comfort to any table. Keep an eye on it while it bakes, as the aroma will fill your kitchen, drawing everyone in with anticipation.
{{image_2}}
Importance of Distributing Butter Evenly for Best Results
A crucial step in achieving the perfect crispy topping for your Cherry Crisp is the even distribution of butter throughout the mixture. When preparing the crumbly topping, it’s essential to ensure that the butter is well incorporated with the oats, flour, and sugar. This process not only adds richness to the topping but also contributes to its texture and crunchiness.
To achieve this, use your fingertips or a pastry cutter to rub the cold butter into the dry ingredients until the mixture resembles coarse crumbs. This ensures that every bite of the topping has a delightful buttery flavor and the desired crispy texture. Remember, the key to a successful crisp lies in the evenness of the butter distribution!
Assembling the Dish
Once you have prepared your cherry filling and crumb topping, it’s time to assemble your dish.
Techniques for Layering the Topping Over the Cherry Filling Effectively
Begin by pouring the prepared cherry filling into a greased baking dish. Make sure to spread it evenly across the bottom of the dish. This allows for uniform cooking and ensures every spoonful contains a perfect balance of fruit and topping.
Next, take the crumb topping and sprinkle it generously over the cherry filling. To achieve an even spread, use a spoon to scoop portions of the topping and gently drop it over the cherries. Avoid pressing the topping down too firmly; this can create a dense crust rather than a light, airy one. Instead, allow the pieces to sit loosely on top. This layering technique not only enhances the visual appeal but also contributes to the texture, ensuring you get a satisfying crunch in every mouthful.
Baking the Cherry Crisp
Ideal Baking Time and Temperature for Achieving a Golden Brown Topping
Preheat your oven to 350°F (175°C) before placing your assembled Cherry Crisp inside. The ideal baking time typically ranges from 30 to 40 minutes. This timing allows the cherries to bubble and the topping to achieve that coveted golden-brown color.
Signs That Indicate the Crisp is Ready: Bubbling Filling and Golden Crust
Keep an eye on your crisp as it bakes; the visual cues are crucial indicators of doneness. Look for the cherry filling to bubble around the edges, which indicates that the fruit is cooked through and has released its natural juices. Simultaneously, the topping should turn a lovely shade of golden brown. If the topping begins to brown too quickly, you can cover it with aluminum foil to prevent burning while the filling continues to cook.
Cooling and Serving
Importance of Cooling Time for Optimal Texture and Flavor
Once your Cherry Crisp is out of the oven, it’s tempting to dive right in. However, allowing your crisp to cool for at least 10 to 15 minutes is essential. This cooling period helps the juices thicken and the flavors meld, leading to a more enjoyable eating experience.
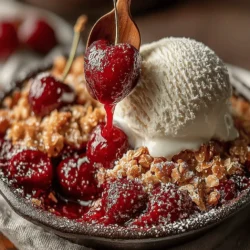
Suggestions for Serving: Pairing with Ice Cream or Whipped Cream for Enhanced Enjoyment
Serving your Cherry Crisp warm is a delightful way to enjoy this dish. Consider garnishing it with a scoop of vanilla ice cream or a dollop of freshly whipped cream. The creamy texture of ice cream beautifully contrasts with the crispy topping and tart cherries, enhancing the overall sensory experience of this dessert.
Presentation Ideas for Serving Crispy Cherry Crisp
Rustic Serving Suggestions: Individual Ramekins Versus Family-Style Dish
For a charming presentation, consider serving your Cherry Crisp in individual ramekins. This not only adds an elegant touch but also makes for a fun, personalized experience for your guests. Alternatively, you can serve it family-style in a larger dish, allowing everyone to help themselves. Whichever method you choose, the rustic appeal of the Cherry Crisp will surely impress.
Garnishing Tips: Using Fresh Mint for Visual Appeal and Added Freshness
To elevate your presentation, garnish each serving with a sprig of fresh mint. The vibrant green color adds a pop of freshness that complements the vibrant cherries. Additionally, mint’s aromatic qualities enhance the overall eating experience, making each bite even more delightful.
Discussing the Sensory Experience of the Dessert: Flavors, Textures, and Aromas
When it comes to enjoying your Cherry Crisp, the sensory experience is truly remarkable. The sweet and tart flavors of the cherries, combined with the crunchy, buttery topping, create a harmonious balance that is both comforting and indulgent. The warm aroma wafting from the oven, filled with notes of baked fruit and toasted oats, sets the stage for a delightful dessert experience. Each spoonful delivers a satisfying crunch followed by the lusciousness of the cherries, making it a dessert to savor.
Nutritional Insights
Discuss the Nutritional Benefits of Cherries and Nuts
Cherries are not just delicious; they are also packed with health benefits. They are rich in antioxidants and contain anti-inflammatory properties, which can help reduce the risk of chronic diseases. Additionally, cherries are a good source of vitamins A and C, which are essential for immune function and skin health.
If you choose to include nuts in your topping, they provide added nutrition, including healthy fats, protein, and fiber. Nuts like almonds or walnuts can enhance the nutty flavor of the crisp while contributing to its overall nutritional profile.
Overview of the Overall Healthiness of the Dessert Compared to Other Options
While Cherry Crisp is a dessert, it can be a healthier option compared to many others that are loaded with processed sugars and unhealthy fats. By using fresh cherries and controlling the sugar in the topping, you can create a dessert that satisfies your sweet tooth while still offering nutritional benefits.
Suggestions for Potential Ingredient Substitutions for Dietary Preferences (Gluten-Free, Nut-Free)
For those with dietary restrictions, Cherry Crisp can easily be adapted. To make it gluten-free, substitute regular flour with almond flour or a gluten-free flour blend. If you or your guests have nut allergies, you can omit nuts from the topping entirely or replace them with seeds like pumpkin or sunflower seeds for added crunch without the allergens.
Conclusion
Crispy Cherry Crisp is a delightful and simple dessert that brings the flavors of summer to your table, no matter the season. With its combination of juicy cherries and a perfectly crispy topping, this dish is sure to become a favorite among family and friends. The process of creating this dessert is not only enjoyable but also rewarding, as you can share the joy of homemade goodness with your loved ones.
As you gather around the table, savoring every bite of this comforting dessert, you’ll appreciate the flavors and memories that come with each serving. We encourage you to try this recipe and relish in the delightful experience it brings, celebrating the irresistible taste of cherries in a comforting and satisfying dessert. Enjoy your baking adventure and the joy of sharing delicious food with those closest to you!