Frozen Yogurt Peanut Butter Waffle Sandwiches Recipe
As the temperatures rise and the sun shines longer, the allure of frozen treats becomes irresistible. There’s something undeniably refreshing about indulging in a chilled dessert during warm weather, and the Frozen Yogurt Peanut Butter Waffle Sandwiches offer a delightful combination of creamy, crunchy, sweet, and savory that will excite your taste buds. These sandwiches are not just a treat; they marry the richness of peanut butter with the cool, smooth texture of frozen yogurt, all enveloped between perfectly toasted waffles.
This recipe stands out for its unique flavor profile and the health-conscious choices it incorporates. By using Greek yogurt, you’re not only adding a deliciously tangy element but also reaping the benefits of probiotics and protein. Paired with natural sweeteners such as honey or maple syrup, you can create a dessert that satisfies your sweet tooth without relying on processed sugars. The addition of nutty peanut butter further enhances the nutritional value, making these waffle sandwiches a guilt-free indulgence.
Understanding the Ingredients
To truly appreciate the Frozen Yogurt Peanut Butter Waffle Sandwiches, it’s essential to understand the key ingredients that come together to create this delightful dessert.
1. Vanilla Greek Yogurt: The star of the show, vanilla Greek yogurt serves as the creamy base for these sandwiches. Rich in protein, it helps keep you full and satisfied while also providing essential probiotics that support gut health. Its natural sweetness and subtle vanilla flavor perfectly complement the other ingredients, making it a crucial component of the recipe.
2. Creamy Peanut Butter: Peanut butter adds a rich, nutty flavor that pairs beautifully with the yogurt. Packed with healthy fats and protein, it not only enhances the taste but also contributes to the overall nutritional profile of the sandwich. The creaminess of the peanut butter brings a satisfying texture that balances the smoothness of the yogurt.
3. Honey or Maple Syrup: These natural sweeteners are excellent alternatives to refined sugars. Honey boasts antibacterial properties and is a natural energy booster, while maple syrup is rich in antioxidants and offers a unique flavor. Both options allow you to control the sweetness level of your frozen yogurt mixture, ensuring that it is just right for your palate.
4. Waffles: Whether you choose store-bought or homemade waffles, they provide a delightful crunch that contrasts with the creamy filling. Homemade waffles allow for customization in flavor and texture, while store-bought options offer convenience. Either way, the waffles serve as the perfect vessel for your frozen yogurt and peanut butter filling.
5. Optional Add-Ins: To elevate your Frozen Yogurt Peanut Butter Waffle Sandwiches further, consider incorporating mini chocolate chips or fresh fruit slices. Mini chocolate chips can add a touch of indulgence, while fresh fruit like bananas or strawberries can introduce a refreshing burst of flavor and additional nutrients.
Step-by-Step Recipe Instructions
Now that we’ve explored the enticing ingredients, let’s dive into the step-by-step instructions to create these delicious frozen waffle sandwiches.
Preparing the Frozen Yogurt Mixture
Begin by gathering your vanilla Greek yogurt and creamy peanut butter. In a medium mixing bowl, combine equal parts of Greek yogurt and peanut butter. For a standard batch, using one cup of each will yield about four sandwich servings. It’s important to mix the ingredients thoroughly to achieve a smooth and creamy texture. Use a whisk or a spatula to blend them until completely combined, ensuring no streaks of peanut butter remain.
When it comes to sweetness, add in your choice of honey or maple syrup. Start with about two tablespoons and adjust according to your taste preferences. If you wish to add mini chocolate chips, fold them in gently at this stage. Be cautious not to overmix, as this could break down the chocolate chips and affect the overall texture of the mixture. The goal is to create a harmonious blend where the flavors meld together while maintaining delightful bits of chocolate.
Freezing the Mixture
Once your mixture is well combined, it’s time to transfer it to a freezer-safe container. Spread the mixture evenly in the container and smooth the top with a spatula. This will help create a uniform layer that freezes evenly. For best results, cover the container with a lid or plastic wrap to prevent ice crystals from forming on the surface.
The freezing process is crucial for achieving the desired consistency. Ideally, allow the mixture to freeze for at least four hours, but for optimal results, aim for overnight freezing. This extended time will ensure that the mixture solidifies properly, making it easier to scoop and spread between the waffles later.
Toasting the Waffles
While your frozen yogurt mixture is setting, you can prepare the waffles. If you’re using store-bought waffles, simply follow the package instructions for toasting. For homemade waffles, ensure that they are golden brown and crispy on the outside, as this texture will provide a delightful contrast to the creamy filling.
Toasting the waffles not only enhances their flavor but also helps them maintain their structure when filled with the frozen yogurt mixture. A crispy exterior will prevent them from becoming soggy, allowing you to enjoy the perfect balance of textures in each bite.
Once your waffles are toasted to perfection, let them cool slightly before assembling your sandwiches. This step is particularly important if you want the frozen yogurt filling to maintain its shape and remain intact between the waffles.
With the frozen yogurt mixture ready and the waffles toasted, you are well on your way to creating a deliciously satisfying treat that’s perfect for any warm day. Stay tuned for the next part of the recipe, where we will cover the assembly of the Frozen Yogurt Peanut Butter Waffle Sandwiches and tips for serving and storage.
{{image_2}}
Homemade Waffle Options and Their Benefits
When it comes to creating the perfect base for your Frozen Yogurt Peanut Butter Waffle Sandwiches, homemade waffles truly shine. Not only do they taste fresher than store-bought options, but you also have complete control over the ingredients, allowing you to customize your waffles to suit dietary preferences or flavor profiles.
Waffle Variations
1. Classic Buttermilk Waffles: These fluffy waffles are a crowd-pleaser with their soft texture and rich flavor.
2. Whole Wheat Waffles: For a healthier option, whole wheat flour can be substituted, offering more fiber and nutrients.
3. Gluten-Free Waffles: Using almond flour or a gluten-free blend can cater to those with gluten sensitivities, ensuring everyone can enjoy this treat.
4. Vegan Waffles: An egg replacer and plant-based milk can create a delicious vegan version without compromising on taste.
By choosing homemade waffles, you can ensure that each bite is not only delicious but also tailored to your preference, making your sandwich experience even more enjoyable.
Assembling the Sandwiches
Assembling your Frozen Yogurt Peanut Butter Waffle Sandwiches is where the fun begins. Gather your ingredients: homemade waffles, your favorite frozen yogurt, and peanut butter. Here’s how to put it all together:
Step-by-Step Assembly
1. Prepare the Waffles: Start with cooled, fully cooked waffles. If they are fresh and warm, allow them to cool to room temperature to prevent the yogurt from melting too quickly.
2. Spread the Peanut Butter: Generously spread your choice of peanut butter on one side of each waffle. This not only adds flavor but also acts as a barrier to keep the yogurt from soaking into the waffle.
3. Scoop the Frozen Yogurt: Using an ice cream scoop, take a generous scoop of your chosen frozen yogurt and place it on top of the peanut butter on one of the waffles.
4. Top with a Second Waffle: Place another waffle, peanut butter side down, on top of the yogurt scoop. Gently press down to compress the sandwich slightly, ensuring everything holds together.
5. Repeat: Continue assembling the sandwiches until you’ve used up your waffles and yogurt.
Techniques for Scooping the Yogurt and Layering the Sandwiches
When it comes to scooping frozen yogurt, technique is key to achieving the perfect portion. Here are some tips to help you layer your sandwiches beautifully:
– Use a Warm Scoop: Dip your ice cream scoop in warm water before each scoop. This helps the yogurt glide out smoothly, creating a perfect round shape.
– Layer Generously: Don’t be shy with the yogurt! A thick layer makes for a satisfying sandwich. Aim for about 1/2 cup of yogurt per sandwich.
– Spacing Matters: When layering, leave a small margin around the edges of the waffle to prevent overflow. This will help maintain the integrity of the sandwich when you bite into it.
Suggestions for Portion Sizes and Spreading Techniques
A well-sized sandwich can make all the difference. Here are some recommendations for portion sizes:
– Standard Portion: For an average serving, aim for 1/2 cup of frozen yogurt and one tablespoon of peanut butter per sandwich. This provides a balanced treat without overwhelming sweetness.
– Mini Sandwiches: If you’re looking for smaller portions, consider using smaller waffles or cutting large waffles into quarters and adjusting the yogurt and peanut butter accordingly.
For spreading peanut butter, consider using a spatula or the back of a spoon to evenly distribute the nut butter over the waffle. This will ensure that every bite is deliciously coated.
Serving and Storing Options
Recommendations for Serving Immediately Versus Freezing for Later
Once assembled, you have two choices for enjoying your waffles:
1. Serve Immediately: Freshly made sandwiches are delightful when served right away. The contrast between the cold yogurt and the warm, soft waffles is a treat for the senses. Serve them with a drizzle of honey or chocolate sauce for extra indulgence.
2. Freeze for Later: If you want to prepare these sandwiches ahead of time, wrap each sandwich in plastic wrap or store them in an airtight container. They can be frozen for up to two weeks. Just allow them to sit at room temperature for a few minutes before serving, so they soften slightly and are easier to bite into.
Ideas for Presentation to Enhance Visual Appeal
Presentation is key when serving these delightful treats. Here are some creative ideas to make your sandwiches visually appealing:
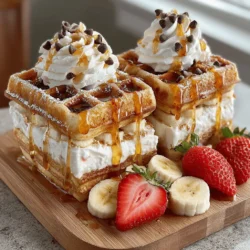
– Plating: Serve the sandwiches on a colorful platter, perhaps garnished with fresh fruits like berries or sliced bananas for a pop of color.
– Drizzles: A drizzle of melted chocolate or caramel on the plate can create a beautiful effect.
– Sprinkles: Adding a sprinkle of crushed nuts or colorful sprinkles on top of the sandwiches can add a festive touch, especially for celebrations or kids’ parties.
Exploring Flavor Variations
While the classic combination is unbeatable, exploring flavor variations can elevate your Frozen Yogurt Peanut Butter Waffle Sandwiches to new heights.
Suggested Variations on the Base Recipe
1. Different Yogurt Flavors: Try using flavored frozen yogurts like strawberry, chocolate, or vanilla bean. Each variation will bring a unique taste to your sandwiches.
2. Alternative Nut Butters: Experiment with almond butter, cashew butter, or sunflower seed butter for a change in flavor and texture.
3. Additional Toppings and Mix-Ins: Consider adding granola, coconut flakes, or mini chocolate chips between the layers for added texture. Fresh fruit slices, such as strawberries or bananas, can also enhance the flavor and nutritional value.
4. Seasonal Variations: Use seasonal fruits to keep things fresh and exciting. In the summer, add fresh peaches or berries; in the fall, try spiced apples or pumpkin puree mixed with yogurt.
Nutritional Benefits of Frozen Yogurt Peanut Butter Waffle Sandwiches
This treat not only satisfies your sweet tooth but also comes with some nutritional advantages worth noting.
Caloric Breakdown of the Main Ingredients
– Frozen Yogurt: Typically lower in fat than ice cream, frozen yogurt provides a good source of calcium and probiotics, which are beneficial for gut health.
– Peanut Butter: Packed with protein and healthy fats, peanut butter can help keep you full longer and provide energy.
– Waffles: Depending on the type of flour used, the waffles can also add fiber and nutrients to your sandwich.
Health Benefits of Consuming Greek Yogurt and Peanut Butter
Greek yogurt is particularly beneficial because it is high in protein, low in sugar, and rich in probiotics. Peanut butter, on the other hand, is a great source of vitamins E and B6, magnesium, and potassium, making this treat a guilt-free indulgence.
Comparison of This Recipe to Traditional Ice Cream Sandwiches
Compared to traditional ice cream sandwiches, which are often high in sugar and fat, these Frozen Yogurt Peanut Butter Waffle Sandwiches provide a healthier alternative that satisfies cravings while still being nutritious.
Conclusion
Creating and enjoying Frozen Yogurt Peanut Butter Waffle Sandwiches is not just about satisfying your sweet tooth; it’s about discovering the joy of homemade treats that combine health and indulgence. With the freedom to experiment with flavors and ingredients, each sandwich can be tailored to your liking, making it a versatile dessert option for any occasion.
We encourage you to explore this recipe and make it your own. Try different yogurt flavors, nut butters, and toppings to find your perfect combination. The satisfaction of crafting these sandwiches from scratch will only enhance your enjoyment, making every bite a delightful experience. Enjoy your culinary adventure and the delicious joy of homemade treats!