Apple cider glazed ham is a delightful dish that brings warmth and joy to any festive occasion. Known for its sweet and tangy flavor profile, this glazed ham becomes the centerpiece of family gatherings and celebrations. The combination of apple cider, spices, and the savory taste of fully cooked ham results in a mouthwatering meal that is both satisfying and impressive. Making your own apple cider glazed ham allows you to tailor the flavors to your liking, ensuring a memorable experience for your guests.
Ingredients
– 1 fully cooked bone-in ham (about 8-10 pounds)
– 1 cup apple cider
– 1/2 cup packed brown sugar
– 1/4 cup Dijon mustard
– 1/4 cup apple cider vinegar
– 1 teaspoon ground cinnamon
– 1 teaspoon ground ginger
– 1/2 teaspoon ground cloves
– 1/2 teaspoon black pepper
– Optional: whole cloves for decoration
– Optional: fresh rosemary for garnish
Instructions
1. Preheat your oven to 325°F (163°C). This temperature is crucial for even cooking and achieving the perfect glaze.
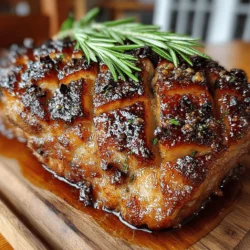
2. Place the fully cooked ham on a large cutting board. Using a sharp knife, score the surface of the ham in a diamond pattern, making shallow cuts about 1 inch apart. This technique allows the glaze to penetrate the meat and enhances the presentation.
3. In a medium saucepan, combine the apple cider, brown sugar, Dijon mustard, apple cider vinegar, ground cinnamon, ground ginger, ground cloves, and black pepper. Stir the mixture over medium heat until the sugar dissolves and the ingredients are well blended.
4. Brush half of the apple cider glaze over the scored surface of the ham, ensuring it gets into the cuts for maximum flavor.
5. Place the ham in a roasting pan and cover it loosely with aluminum foil. Bake in the preheated oven for about 1.5 to 2 hours, or until the internal temperature reaches 140°F (60°C).
6. Remove the foil during the last 30 minutes of cooking, brushing the remaining glaze over the ham every 10 minutes to create a beautiful caramelized finish.
7. Once cooked, remove the ham from the oven and let it rest for 15-20 minutes before slicing. This allows the juices to redistribute, ensuring each slice is moist and flavorful.
Understanding the Ingredients
The centerpiece of this dish is the fully cooked bone-in ham, which provides a rich, savory flavor that pairs beautifully with the sweet and tangy apple cider glaze. The apple cider is essential in creating the glaze’s unique flavor; its natural sugars caramelize during cooking, giving the ham an irresistible shine and taste.
Brown sugar adds a rich sweetness, balancing the tangy notes from the apple cider vinegar and the spiciness of Dijon mustard. Together, these ingredients create a complex glaze that enhances the overall flavor of the ham.
Spices play a significant role in elevating this dish. Ground cinnamon, ginger, cloves, and black pepper each contribute to the depth of flavor, making every bite a delightful experience. For those looking to add a decorative touch, whole cloves can be inserted into the scored areas of the ham, providing both visual appeal and subtle flavor. Fresh rosemary can be used as a garnish, adding an aromatic element that complements the dish perfectly.

Creating the Glaze
Step-by-step Process for Perfect Consistency and Flavor Balance
To achieve a delectable apple cider glaze, start by combining fresh apple cider with brown sugar in a saucepan. Bring the mixture to a gentle simmer over medium heat, stirring until the sugar completely dissolves. Next, add spices like cinnamon, nutmeg, and a splash of apple cider vinegar for acidity. Allow the glaze to simmer until it thickens slightly, which usually takes about 15-20 minutes. This concentrated glaze will provide a rich flavor that beautifully balances sweetness and tartness.
Glazing the Ham
Techniques for Even Application of the Glaze
When it comes to glazing your ham, use a basting brush for an even application. Start by applying the glaze generously over the surface of the ham, making sure to get into any crevices. For optimal flavor, glaze the ham multiple times throughout the baking process. This will create a sticky, caramelized exterior that enhances the overall taste and appearance of the dish.
Cooking the Ham
Baking Process
Cover the ham with aluminum foil during the initial baking stage to keep it moist and prevent over-browning. Bake the ham at a low temperature, around 325°F (163°C), for the best results. Basting the ham every 30 minutes with the reserved glaze will help to build layers of flavor and create a beautiful crust.
Checking for Doneness
To ensure your ham is safe to eat, use a meat thermometer to check the internal temperature. For fully cooked ham, it should reach an internal temperature of 140°F (60°C). If you are starting with a raw ham, aim for an internal temperature of 145°F (63°C).
Resting the Ham
After removing the ham from the oven, allow it to rest for at least 15-20 minutes before slicing. This resting period is crucial as it allows the juices to redistribute throughout the meat, ensuring each slice is juicy and tender.
Presentation and Serving Suggestions
Slicing the Ham
Use a sharp carving knife to slice the ham against the grain for the most tender pieces. Aim for slices that are about half an inch thick. This technique will not only enhance the texture but also improve the overall presentation.
Arranging on a Platter
For an elegant presentation, arrange the sliced ham in a circular pattern on a large serving platter. You can layer the slices slightly overlapping to create an appealing visual effect. Drizzle some additional glaze over the top for an extra touch of sweetness and shine.
Seasonal Fruit Pairings
Enhance your apple cider glazed ham with seasonal fruits such as roasted apples, pears, or cranberries. These fruits not only complement the ham’s flavors but also add a vibrant touch to your presentation.
Use of Herbs in Presentation
Incorporate fresh herbs like rosemary or thyme around the edges of the platter. This not only adds visual interest but also infuses the dish with aromatic notes that will entice your guests.
Conclusion
The apple cider glazed ham is more than just a dish; it’s a centerpiece that brings people together during special gatherings. The harmonious blend of sweet and savory flavors creates a memorable eating experience that your family and friends will cherish. Preparing this dish not only highlights your culinary skills but also showcases the joy of sharing a homemade feast. Don’t hesitate to try this recipe for your next celebration and indulge in the delightful flavors that make it a true crowd-pleaser.