Apple Cider Sticky Buns: A Delicious Fall Treat
Baking sweet treats at home is one of the simplest joys that can transform a regular day into a special occasion. The aroma of fresh pastries wafting through the kitchen, the anticipation of a warm, gooey bite, and the satisfaction of sharing homemade goodies with loved ones create a cozy atmosphere that’s hard to beat. Among the many delightful recipes to embrace during the cooler months, Apple Cider Sticky Buns stand out as a seasonal favorite. These buns are not only a feast for the eyes but also a symphony of flavors that combine the warmth of spices with the tang of fresh apples, making them an ideal indulgence for fall gatherings and family breakfasts.
The magic of Apple Cider Sticky Buns lies in their unique blend of ingredients and the comfort they provide. As the leaves change color and the air turns crisp, there’s a certain nostalgia associated with baked goods that echo the flavors of the season. This recipe encapsulates that feeling perfectly, inviting you to gather around the kitchen with family and friends to enjoy a warm batch of sticky, sweet buns drizzled with a luscious apple cider glaze.
Understanding the Ingredients
To create the perfect Apple Cider Sticky Buns, it is essential to understand the role each ingredient plays in achieving that ideal texture and flavor. The recipe is divided into three main components: the dough, the filling, and the sticky topping.
Dough: The foundation of any good sticky bun starts with a rich, soft dough. For this recipe, you will need all-purpose flour, yeast, sugar, milk, eggs, and butter. Using high-quality ingredients is crucial; fresh, unsalted butter will add richness and flavor, while the quality of your flour can significantly impact the texture of the dough.
Filling: The filling is where the real flavor comes alive. For this, you will need fresh apples, brown sugar, cinnamon, and a pinch of salt. Apples not only add sweetness and moisture but also a delightful tang that complements the spices. Choosing the right apple variety, such as Honeycrisp or Granny Smith, is important for achieving the perfect balance of sweetness and tartness.
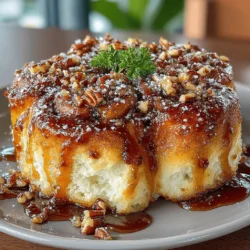
Sticky Topping: Finally, the sticky topping is what makes these buns irresistibly decadent. It typically consists of apple cider, brown sugar, and butter, which create a gooey, caramel-like sauce that seeps into the buns as they bake. The addition of chopped nuts, such as pecans or walnuts, can enhance the texture and add a delightful crunch.
One of the standout ingredients in this recipe is apple cider. Not only does it imbue the dough with a unique flavor profile, but it also contributes moisture, ensuring that your sticky buns remain soft and tender. The fermentation process in the cider enhances the yeast’s activity, resulting in a beautifully risen dough.
The Process of Making Apple Cider Sticky Buns
Creating Apple Cider Sticky Buns is a rewarding process that requires a bit of patience but is ultimately worth the effort. This step-by-step guide will walk you through the crucial phases of this recipe, from preparing the dough to crafting the filling, ensuring that you end up with a batch of sticky buns that are as delightful to make as they are to eat.
Preparing the Dough
The first step in making your Apple Cider Sticky Buns is preparing the dough. Accurate measurement of your ingredients is vital for achieving the perfect dough texture. Start by combining the warm milk and sugar in a bowl, then sprinkle the yeast over the top. Allow it to sit for about five minutes until it becomes frothy, which indicates that the yeast is active. This is a crucial step; if the yeast doesn’t froth, it’s best to start over with fresh yeast to ensure your buns rise properly.
In a separate bowl, whisk together the flour and salt, then gradually add the yeast mixture, eggs, and melted butter. Mix until a shaggy dough forms. At this stage, you may find it helpful to use a stand mixer with a dough hook attachment to knead the dough, as this will make the process easier and more efficient.
Once your dough has come together, it’s time to knead. Kneading is essential for gluten development, which gives the dough its structure and elasticity. Aim for about 8-10 minutes of kneading until the dough is smooth and elastic. As you knead, keep your work surface lightly floured to prevent sticking, but be careful not to add too much flour, as this can make the dough dense.
Kneading and First Rise
After kneading, shape the dough into a ball and place it in a greased bowl, covering it with a clean kitchen towel or plastic wrap. This step is where the dough begins to rise. To create an ideal environment for rising, find a warm spot in your kitchen; you can even place the bowl in an oven that has been preheated for a minute and then turned off. Allow the dough to rise for about 1 to 1.5 hours, or until it has doubled in size.
You can tell that your dough has risen sufficiently when you gently press two fingers into it and the indentation remains. This means the gluten has developed properly, and the yeast has done its job in creating bubbles throughout the dough.
Crafting the Filling
While the dough is rising, it’s time to prepare the filling. Start by peeling and coring your apples, then chop them into small pieces. This is where personal preference comes into play—choose a mix of sweet and tart apples to add depth to the flavor profile.
In a bowl, combine the chopped apples with brown sugar, cinnamon, and salt. The brown sugar will melt into the apples as they bake, creating a luscious filling that contrasts beautifully with the fluffy dough. If you want to take it up a notch, consider adding chopped nuts like pecans or walnuts for added texture and crunch.
Once the dough has risen and your filling is ready, you’ll be well on your way to assembling your Apple Cider Sticky Buns. The combination of the soft dough, the spiced apple filling, and the sticky topping will create an unforgettable treat that captures the essence of fall in every bite. Stay tuned for the next steps on how to assemble, bake, and enjoy these delightful buns!
{{image_2}}
Rolling and Cutting the Dough
Once your dough has risen beautifully, it’s time to roll it out into a perfect rectangle. This step is crucial for ensuring that your Apple Cider Sticky Buns are evenly baked and deliciously filled.
Techniques for Rolling the Dough
To achieve a uniform thickness, start by lightly flouring your work surface and rolling pin. When rolling the dough, apply gentle, even pressure. Start from the center and roll outward in all directions. This technique helps to avoid tearing and ensures that the dough maintains an even thickness throughout. Aim for a rectangle that measures approximately 12 by 18 inches and is about ½ inch thick.
If you find the dough is a bit sticky, add a dusting of flour as you go, but be careful not to incorporate too much flour, as this can alter the texture of the buns. Once rolled out, check for any uneven areas and use your fingertips to gently press them into shape.
Tips for Cutting the Dough
After rolling out the dough, it’s time to fill and slice it. For cutting the dough into uniform pieces, use a sharp knife or a pizza cutter for clean edges. First, spread your chosen filling evenly over the surface, leaving a small border around the edges. Once filled, roll the dough tightly from one long side to the other to form a log.
Next, slice the log into equal pieces, about 1 to 1.5 inches thick. For perfectly uniform pieces, you can use a ruler to mark where you will cut. Additionally, if you want to avoid squishing the buns while cutting, use a gentle sawing motion rather than pressing down too hard.
Creating the Sticky Topping
The sticky topping is what elevates these buns to the next level. It’s sweet, rich, and absolutely delicious.
Step-by-Step Instructions for Preparing the Sticky Glaze
To create the sticky topping, gather the following ingredients: brown sugar, unsalted butter, apple cider, and a pinch of salt. Start by melting the butter in a medium saucepan over medium heat. Once melted, add the brown sugar and stir until it begins to dissolve.
Next, pour in the apple cider and salt. Increase the heat slightly and bring the mixture to a gentle boil. Stir constantly until the mixture is smooth and well combined, taking care to dissolve any remaining sugar granules. This process should take about 5-7 minutes. Once the glaze is ready, remove it from the heat and let it cool slightly before pouring it into your prepared baking dish.
The importance of cooking the mixture until smooth cannot be overstated; this ensures that the topping adheres perfectly to the buns and provides that signature sticky texture you crave.
Second Rise and Baking
After you’ve cut the dough and placed the buns in the prepared baking dish with the sticky topping, it’s crucial to allow them to rise again before baking.
Importance of Allowing the Dough to Rise a Second Time
This second rise, known as proofing, allows the yeast to continue working, resulting in lighter and fluffier buns. Cover the dish with a clean kitchen towel and let it sit in a warm place for about 30-45 minutes. You’ll know the buns are ready when they have doubled in size and have puffed up against each other.
Tips for Achieving Golden Brown and Perfectly Baked Sticky Buns
While your buns are rising, preheat your oven to 350°F (175°C). Once the dough has risen, it’s time to bake! Place the baking dish in the oven and bake for 25-30 minutes or until the tops are golden brown and the sticky topping is bubbling.
To check for doneness, insert a toothpick into the center of a bun; it should come out clean or with a few moist crumbs but no wet dough. If the tops brown too quickly, consider covering the buns loosely with aluminum foil for the last few minutes of baking to prevent burning.
Cooling and Serving Suggestions
Once baked, remove the sticky buns from the oven and let them cool in the pan for about 10 minutes. This cooling process is essential, as it allows the sticky topping to set slightly, making it easier to serve.
Ideas for Serving
Apple Cider Sticky Buns are best enjoyed warm. Serve them as a delightful breakfast treat or as a sweet snack during the day. They pair wonderfully with a hot cup of coffee or tea, creating a cozy experience perfect for chilly fall mornings. For dessert, consider drizzling a bit more glaze on top or serving with a scoop of vanilla ice cream for a decadent indulgence.
The Joy of Homemade Sticky Buns
Baking Apple Cider Sticky Buns isn’t just about the final product; it’s about the entire sensory experience. The aroma of cinnamon, sugar, and apples wafting through your kitchen creates an inviting atmosphere that draws family and friends together.
Personal Anecdotes
Many bakers find that sharing these sticky buns brings joy and warmth to their homes. Whether it’s a Sunday brunch with loved ones or a festive gathering, the process of baking and sharing these treats fosters connection and creates lasting memories. The smiles on the faces of those who indulge in your homemade sticky buns are the ultimate reward.
Nutritional Insights
While Apple Cider Sticky Buns are undeniably a treat, it’s worth noting their nutritional components. Each bun contains carbohydrates, sugars, and fats, primarily from the dough and sticky topping. While they are not a health food, enjoying them in moderation can fit into a balanced diet.
Discussion on Enjoying Them as a Treat in Moderation
Consider serving these buns for special occasions or weekend breakfasts rather than everyday indulgences. This way, they remain a delightful treat that everyone looks forward to.
Conclusion
In conclusion, making Apple Cider Sticky Buns is a delightful experience that combines warmth, sweetness, and the comforts of home. From the comforting aroma that fills your kitchen to the irresistible taste of warm, gooey buns, this recipe is sure to become a cherished tradition in your household, especially during the fall and festive seasons.
Whether you’re enjoying them with family or sharing them with friends, these sticky buns encapsulate the essence of togetherness and the joy of homemade treats. So roll up your sleeves and embrace the joy of baking — your taste buds will thank you, and your loved ones will surely appreciate the delicious results.