Blueberry Bliss No-Bake Bars: A Deliciously Easy Dessert
In recent years, no-bake desserts have surged in popularity, and for good reason. These delightful treats offer the perfect solution for those looking to satisfy their sweet tooth without the hassle of preheating the oven or spending hours in the kitchen. Among the myriad of no-bake options, Blueberry Bliss No-Bake Bars stand out as a wholesome and delectable choice. Not only are they incredibly simple to prepare, but they also bring a burst of flavor and nutrition that leaves you feeling satisfied without the guilt.
These Blueberry Bliss No-Bake Bars are crafted with wholesome ingredients that cater to a variety of dietary preferences, including gluten-free and vegan options. With the rich taste of blueberries and an array of nutrient-dense components, this recipe is ideal for anyone looking to indulge in a sweet treat while maintaining a healthy lifestyle. Whether you’re a busy parent searching for a quick snack for your kids, a health-conscious individual craving something sweet, or simply someone who enjoys cooking, these bars offer the perfect balance of convenience and enjoyment.
Understanding No-Bake Bars
So, what exactly are no-bake bars? At their core, no-bake desserts are delicious confections that require little to no cooking. Instead of relying on the oven, they often utilize a refrigerator or freezer to set and firm up, making them an ideal choice for those hot summer days or when time is short. No-bake bars have gained traction in contemporary cooking due to their versatility and ease of preparation. With just a few simple steps, you can whip up a batch of treats that are not only satisfying but also packed with nutrients.
One of the main advantages of no-bake bars is their quick preparation time. Most recipes can be completed in under 30 minutes, allowing you to enjoy a homemade dessert without the lengthy process involved in traditional baking. Additionally, their minimal cooking requirements make them easy to store, meaning you can prepare a batch and keep it on hand for whenever a craving strikes. This makes Blueberry Bliss No-Bake Bars an excellent option for meal prep or for those who want a healthy snack readily available.
When it comes to ingredients, choosing healthy options is key. In this recipe, we incorporate almond flour, rolled oats, and blueberries, each of which offers unique health benefits. Almond flour is an excellent gluten-free alternative to traditional wheat flour, providing a nutty flavor and a boost of protein and healthy fats. Rolled oats are packed with fiber, promoting digestive health and providing sustained energy, while blueberries are renowned for their rich antioxidant content, making them a nutritional powerhouse. By opting for these ingredients, you not only create a delicious dessert but also one that supports overall well-being.
Ingredient Breakdown
Before diving into the step-by-step preparation of Blueberry Bliss No-Bake Bars, let’s take a closer look at the ingredients that make this recipe not only tasty but also healthy.
– Almond Flour: This gluten-free flour is made from finely ground almonds, offering a nutty flavor and a wealth of nutritional benefits. Almond flour is high in protein, healthy fats, and vitamin E, making it a fantastic choice for those looking to maintain a balanced diet while enjoying a delicious treat.
– Rolled Oats: A staple in many healthy recipes, rolled oats are rich in dietary fiber, which can aid in digestion and promote a feeling of fullness. They provide complex carbohydrates that offer sustained energy, making them an ideal ingredient for a snack that keeps you going throughout the day.
– Unsweetened Shredded Coconut: Not only does shredded coconut add a delightful texture and flavor to the bars, but it also provides healthy fats that contribute to overall health. This ingredient enhances the chewiness of the bars while complementing the sweetness of the blueberries.
– Maple Syrup and Almond Butter: These natural sweeteners serve a dual purpose in the recipe. Maple syrup adds a touch of sweetness while offering minerals like manganese and zinc, and almond butter provides a creamy consistency along with healthy fats, making the bars satisfying without the need for refined sugars.
– Vanilla Extract and Salt: Though seemingly small additions, vanilla extract enhances the overall flavor profile, imparting a warm, sweet aroma. A pinch of salt balances the sweetness, ensuring the bars are perfectly flavored.
– Blueberries: The star ingredient of this recipe, blueberries are not only delicious but also packed with antioxidants, vitamins, and minerals. Their natural sweetness and vibrant color make them a perfect addition to this no-bake treat.
– Walnuts and Dark Chocolate Chips (Optional): For those looking to add extra texture and indulgence, walnuts and dark chocolate chips are excellent optional ingredients. Walnuts provide healthy omega-3 fatty acids, while dark chocolate chips offer a rich, sweet contrast that elevates the overall flavor of the bars.
Step-by-Step Recipe Instructions
Now that we’ve covered the essentials of the ingredients, let’s dive into the preparation of Blueberry Bliss No-Bake Bars. The process is straightforward and can be completed in just a few easy steps.
1. Prepare the Base: Start by thoroughly mixing the dry ingredients. In a large mixing bowl, combine the almond flour, rolled oats, and unsweetened shredded coconut. It’s important to ensure these dry ingredients are well mixed to create a consistent base for your bars. This step not only promotes even distribution of flavors but also contributes to the binding properties that will hold the bars together.
2. Mix Wet Ingredients: In a separate bowl, combine the wet ingredients, which include maple syrup, almond butter, and vanilla extract. Using a whisk or spoon, mix these ingredients until they form a smooth and creamy consistency. This step is crucial, as it ensures that the almond butter and syrup blend well together, allowing for a uniform sweetness throughout the bars.
3. Combine Mixtures: Once both the dry and wet ingredients are prepared, it’s time to combine them. Gradually pour the wet mixture into the bowl with the dry ingredients, stirring continuously. This technique helps achieve proper binding and consistency in the bars. Make sure to fold in the blueberries gently to avoid crushing them, ensuring that each bite is bursting with flavor.
As you combine the mixtures, you may find that the texture is slightly crumbly; this is normal for no-bake bars. If needed, you can add a splash of water or extra almond butter to help bind the mixture together. Once you have reached a consistency that holds together well, it’s time to transfer the mixture to a lined baking dish.
This is where the fun really begins!
Stay tuned for the next part of the article, where we will cover the final steps to create these delightful Blueberry Bliss No-Bake Bars and share tips for storing and serving them.
{{image_2}}
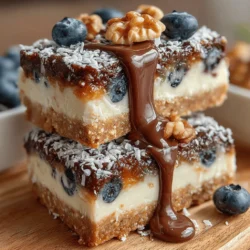
Incorporate Blueberries and Walnuts
To ensure a well-balanced flavor in your Blueberry Bliss No-Bake Bars, it’s crucial to evenly distribute the blueberries and walnuts throughout the mixture. Start by folding the blueberries into the base mixture gently. If you’re using fresh blueberries, consider rinsing and drying them beforehand to remove any excess moisture that could affect the texture of your bars.
For walnuts, chop them roughly before incorporating them into the mixture. This helps to release their oils and flavors while providing a delightful crunch to every bite. Aim for a distribution where each slice of the bar has a bit of blueberry and walnut in it. This not only elevates the taste but also adds to the visual appeal of the bars, making them inviting and delicious.
Press into the Pan
Once your mixture is ready, it’s time to press it into the pan. This step is critical for achieving the right texture and structure in your no-bake bars. Use a piece of parchment paper to line an 8-inch square baking pan for easy removal later.
Scoop the mixture into the prepared pan and spread it evenly using a spatula. To compact the mixture, press down firmly with your hands or a flat-bottomed measuring cup. The more compact the layer, the better your bars will hold together once set. If the mixture is too loose, the bars might crumble when you slice them, so take your time with this step to ensure a solid foundation.
Chill and Set
Chilling is a crucial part of the no-bake bar-making process. After pressing the mixture into the pan, place it in the refrigerator for at least two hours, or until it has firmed up. This step allows the ingredients to meld together and solidifies the bars, ensuring they hold their shape when cut.
During chilling, the nut butter and sweetener will bind the ingredients, creating a cohesive texture. This process also enhances the flavors, as the natural sweetness of the blueberries develops further when allowed to rest. If you’re in a hurry, you can place the pan in the freezer for about 30-45 minutes, but keep an eye on it to avoid freezing the mixture solid.
Optional Topping
If you want to elevate your Blueberry Bliss No-Bake Bars further, consider adding a chocolate topping. Melting chocolate is straightforward but requires a little care to avoid seizing. You can use dark chocolate, milk chocolate, or even white chocolate, depending on your preference.
To melt the chocolate, break it into small pieces and place it in a heatproof bowl. Use a microwave in 20-second intervals, stirring in between, until fully melted and smooth. Alternatively, you can use a double boiler method by placing the bowl over a pot of simmering water, stirring until melted.
Once melted, pour the chocolate over the chilled bars in the pan, spreading it evenly with a spatula. The richness of the chocolate not only enhances the flavor profile but also adds a glossy finish that makes these bars even more enticing. Return the bars to the refrigerator for another 30 minutes to allow the chocolate to set.
Slice and Serve
When your bars have chilled completely, it’s time to slice and serve. To achieve clean cuts, use a sharp knife that has been warmed under hot water. This prevents the bars from sticking to the blade and ensures neat edges.
Cut the bars into squares or rectangles, depending on your serving preference. If you’re planning to serve a crowd, smaller bites are ideal, while larger pieces work well for a satisfying snack. Arrange them on a platter and feel free to garnish with additional blueberries or a sprinkle of chopped walnuts for added visual appeal.
Store
To keep your Blueberry Bliss No-Bake Bars fresh and delicious, proper storage is key. Place any leftover bars in an airtight container and store them in the refrigerator. They can last for up to a week, though they’re usually devoured much sooner!
If you want to extend their shelf life, consider freezing the bars. Cut them into portions and wrap each piece in plastic wrap before placing them in a freezer-safe container. When ready to enjoy, simply thaw them in the refrigerator overnight. This method not only preserves their freshness but also makes for quick snacks on busy days.
Nutritional Information
One of the significant advantages of making your Blueberry Bliss No-Bake Bars is knowing exactly what goes into them. The key ingredients — blueberries, walnuts, and nut butter — offer numerous health benefits.
– Blueberries are packed with antioxidants, vitamins C and K, and fiber, making them great for heart health and brain function.
– Walnuts provide omega-3 fatty acids, protein, and healthy fats, contributing to improved brain health and reduced inflammation.
– Nut butter is a good source of protein and healthy fats, which can keep you feeling full longer.
In terms of caloric content, each bar contains approximately 150-200 calories, depending on the specific ingredients and quantities used. You can customize the recipe to lower the sweetness by reducing the sweetener or opting for a natural low-calorie sweetener.
For those with dietary restrictions, this recipe is naturally gluten-free and can easily be made vegan by using plant-based sweeteners and nut butter. Additionally, you can substitute walnuts for seeds or other nuts if allergies are a concern.
Creative Variations and Substitutions
Experimentation is part of the joy of cooking, and this no-bake bars recipe is no exception. Here are some creative variations and substitutions to consider:
– Nut Butters: While almond butter and peanut butter are popular choices, you can try sunflower seed butter for a nut-free option or cashew butter for a creamier texture.
– Sweeteners: Maple syrup, agave nectar, or honey can replace the sweetener in the original recipe, each imparting a unique flavor.
– Add-Ins: Consider folding in other ingredients like shredded coconut, chia seeds, or even dark chocolate chips for added texture and flavor.
– Seasonal Variations: Swap blueberries for other seasonal fruits such as raspberries in summer or cranberries in fall. Each fruit brings its own distinct flavor and nutritional profile.
– Flavor Enhancements: Adding spices like cinnamon or nutmeg can elevate the flavor, while a splash of vanilla or almond extract can create a delightful aroma that complements the bars wonderfully.
The Joy of Homemade Snacks
Creating your snacks at home offers numerous benefits compared to store-bought options. Homemade snacks tend to be fresher, free from preservatives, and customizable to your taste preferences. By preparing snacks like the Blueberry Bliss No-Bake Bars, you control every ingredient, ensuring that you’re fueling your body with wholesome nutrition.
These bars are perfect for various lifestyles. They serve as great post-workout fuel, a healthy treat for kids, or an afternoon pick-me-up during busy workdays. The versatility of these bars means they can fit seamlessly into any dietary plan, providing energy and satisfaction without the guilt.
Encouragement to experiment with flavors and textures is crucial as you craft your own versions of no-bake treats. Don’t be afraid to mix and match ingredients or try new combinations. The kitchen is a playground, and these bars are a fantastic canvas for your culinary creativity!
Conclusion
The Blueberry Bliss No-Bake Bars are a perfect example of how easy and rewarding it can be to create healthy snacks at home. With their vibrant flavor, nutritious ingredients, and simple preparation, they are sure to become a staple in your kitchen.
Incorporating wholesome snacks into your daily diet can be a game-changer for your energy levels and overall well-being. With this recipe, you can indulge in a delicious treat while knowing you’re making a nutritious choice.
Embrace the creativity that comes with no-bake recipes and enjoy the process of crafting your own versions of these bars. Whether you stick with the original flavor or explore new variations, the possibilities are endless, and the result is always a tasty and satisfying snack!