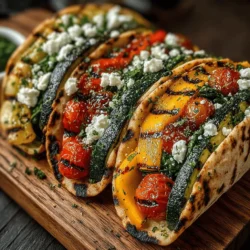
Colorful Mini Roasted Veggie Pita Wraps: A Wholesome Delight
In today’s culinary landscape, where vibrant colors and wholesome ingredients come together to create not just meals but experiences, Colorful Mini Roasted Veggie Pita Wraps stand out as a delightful option. These wraps are not only visually appealing, but they also offer a burst of flavor and nutrients, making them a perfect choice for any meal of the day—be it lunch, dinner, or a healthy snack. The combination of roasted vegetables nestled within a soft pita creates a satisfying and nutritious dish that everyone can enjoy, from vegetarians to meat lovers.
Incorporating colorful vegetables into your meals is essential for numerous reasons. Not only do they add visual appeal, but they also bring a wealth of vitamins, minerals, and antioxidants that are crucial for maintaining good health. Eating a variety of colors ensures that you receive a broad spectrum of nutrients, which can help boost your immune system, improve digestion, and reduce the risk of chronic diseases. The Colorful Mini Roasted Veggie Pita Wraps are a fantastic way to introduce a rainbow of vegetables into your diet, making healthy eating both fun and delicious.
The versatility of this recipe is another of its standout features. You can easily adapt it to suit your taste preferences or dietary restrictions. Whether you prefer a Mediterranean twist with feta cheese and olives or a Middle Eastern flair with hummus, the options are endless. This adaptability not only makes it a suitable dish for various occasions but also encourages creativity in the kitchen. Plus, it’s an excellent way to use up leftover vegetables, minimizing food waste while maximizing flavor.
Understanding the Ingredients
To create these delicious Colorful Mini Roasted Veggie Pita Wraps, it’s essential to understand the role of each ingredient. The main stars of this dish are, of course, the vegetables. Common choices include bell peppers, zucchini, red onions, and cherry tomatoes, each packed with their unique nutritional benefits.
– Bell Peppers are rich in vitamins A and C, offering antioxidant properties that support eye health and immune function. Their natural sweetness intensifies during roasting, adding depth to the wraps.
– Zucchini is low in calories yet high in hydration, making it a great choice for those looking to maintain a healthy weight. Its mild flavor allows it to absorb the spices and seasonings beautifully.
– Red Onions provide a sharp, tangy taste that mellows out as they roast, contributing layers of flavor to the dish. They are also a good source of vitamins and antioxidants.
– Cherry Tomatoes burst with flavor and add a juicy texture to the wraps. They are high in lycopene, an antioxidant linked to various health benefits, including heart health.
In addition to the vegetables, the use of olive oil and spices plays a pivotal role in enhancing the overall flavor profile of the dish. Olive oil not only helps in roasting, ensuring that vegetables caramelize beautifully, but it also adds healthy fats that aid in nutrient absorption. Seasoning your vegetables with a blend of herbs and spices—such as garlic powder, oregano, and paprika—can elevate the taste, making each bite a tantalizing experience.
While the core recipe shines with just these basics, you can also explore optional ingredients to enhance your wraps. A spread of hummus can add creaminess and depth, while crumbled feta cheese brings a salty, tangy contrast that perfectly complements the sweet roasted veggies. Fresh parsley or cilantro can provide a burst of freshness, rounding out the flavors and adding a touch of color.
Preparation of Colorful Mini Roasted Veggie Pita Wraps
Before diving into the preparation of your Colorful Mini Roasted Veggie Pita Wraps, it’s crucial to preheat your oven to ensure optimal roasting. A hot oven is key to achieving that perfect caramelization that enhances the natural sweetness of the vegetables. Aim for a temperature of around 425°F (220°C), which will allow the vegetables to roast quickly and evenly.
Once your oven is preheated, it’s time to prepare the vegetables. Start by washing and drying each vegetable thoroughly. This step is essential because excess moisture can prevent proper roasting and lead to soggy veggies. Next, chop your vegetables into uniform pieces—about one-inch cubes for bell peppers and zucchini, and wedges for red onions. This ensures even cooking and allows all the veggies to roast at the same rate.
Benefits of Each Vegetable Used
As you prepare your vegetables, it’s worth considering the benefits of each one. Bell peppers, as mentioned, are great for their vitamin content, while zucchini contributes hydration and fiber. Red onions add not just flavor but also beneficial compounds that support heart health. Cherry tomatoes, bursting with flavor, are a source of vitamins C and K. By choosing a variety of colors, you’re not just making a beautiful dish; you’re also packing in a range of health benefits.
Once your vegetables are chopped, it’s time to season them. Drizzle the olive oil generously over the prepared vegetables. The oil not only helps in cooking but also facilitates the adherence of spices. Sprinkle your chosen spices over the top, ensuring an even distribution. Toss everything together in a large bowl, using your hands or a spoon to mix until each piece is evenly coated in oil and seasoning. This step is vital, as it ensures that every bite of your veggie wrap is flavorful.
Emphasizing the Seasoning Process and Flavor Profiles
The seasoning process is crucial in bringing out the best in your vegetables. Experimenting with different herbs and spices can yield a variety of flavor profiles, making the wraps unique each time you prepare them. For instance, adding a pinch of cayenne can bring a little heat, while a sprinkle of Italian seasoning or mixed herbs can create a Mediterranean vibe. The balance of herbs, spices, and olive oil should enhance the natural flavors of the vegetables without overpowering them.
Once seasoned, spread the vegetables evenly on a baking sheet lined with parchment paper. This not only prevents sticking but also allows for easy cleanup. Ensure that the vegetables are spread out in a single layer; overcrowding the pan can lead to steaming rather than roasting.
With your vegetables prepped and seasoned, they are now ready for the oven, where they will transform into the flavorful filling for your Colorful Mini Roasted Veggie Pita Wraps.
Roasting the Vegetables
Roasting is a transformative cooking method that enhances the natural flavors of vegetables through caramelization. When subjected to high heat, the sugars in the vegetables break down, resulting in a rich, savory taste and a pleasing texture. The goal here is to achieve that perfect balance of tenderness inside and slight crispiness on the outside.
During the roasting process, it’s essential to check on your vegetables halfway through. Stirring them ensures even cooking and allows all sides to benefit from the heat. This step is key to achieving that golden-brown finish that signals perfectly roasted veggies. Keep an eye on them as they roast, as cooking time may vary depending on your oven and the size of your vegetable pieces.
By following these initial steps, you will set the foundation for creating delicious and nutritious Colorful Mini Roasted Veggie Pita Wraps that are sure to impress at any table. The combination of vibrant veggies, fragrant spices, and the warm embrace of pita bread creates a wholesome dish that is not only good for you but also a feast for the eyes.
{{image_2}}
Warming the Pita Breads
Warming your pita bread is crucial for enhancing its flavor and texture, making it more pliable for wrapping. There are several effective methods to warm pita bread, each offering a slightly different result.
Methods to Warm Pita Bread
1. Oven: Preheat your oven to 350°F (175°C). Wrap the pita breads in aluminum foil and place them on a baking sheet. Heat for about 10-15 minutes or until warm. This method ensures an even warmth throughout the pita.
2. Stovetop: Heat a non-stick skillet over medium heat. Place the pita in the skillet without any oil and warm for about 1-2 minutes on each side until they are soft. This method gives a slight crispness to the outer layer, adding texture.
3. Microwave: For a quick option, wrap the pita in a damp paper towel and microwave for about 20-30 seconds. While this method is fast, it can sometimes make the pita a bit chewy if overcooked.
4. Grill: If you’re feeling adventurous, you can warm the pita on a grill for added smoky flavor. Place them directly on the grill for about 1-2 minutes on each side. This method not only warms the pita but also adds a delightful char.
Using whole wheat pita bread is highly recommended for this recipe. Whole wheat pita provides additional fiber and nutrients compared to its white counterpart, making it a healthier choice. The nutty flavor of whole wheat complements the roasted veggies beautifully, enhancing the overall taste of your wraps.
Assembling the Pita Wraps
Once your pita breads are warm, it’s time to assemble your colorful mini roasted veggie wraps. Proper assembly is key to enjoying a balanced flavor and texture in every bite.
Step-by-Step Guide to Assembling the Wraps
1. Prepare the Base: Start by laying a warm pita on a clean, flat surface. This will be your base for the wraps.
2. Spread the Sauce: If you’re using a sauce or spread (like hummus, tzatziki, or a yogurt-based dressing), spread a generous layer on one side of the pita. This not only adds flavor but also helps hold the other ingredients in place.
3. Layer the Vegetables: Begin layering the roasted vegetables. Start with the denser veggies, such as sweet potatoes or bell peppers, followed by lighter ones like zucchini and cherry tomatoes. Aim for a colorful mix to make each wrap visually appealing.
4. Add Fresh Ingredients: Top the roasted veggies with fresh ingredients like arugula, spinach, or shredded lettuce. Adding fresh herbs like cilantro or parsley can elevate the flavor profile significantly.
5. Finish with Extras: If desired, sprinkle some crumbled feta cheese, olives, or avocado slices on top for added creaminess and depth of flavor.
6. Wrap It Up: Finally, fold the pita in half, enclosing the delicious filling. You can also roll it tightly like a burrito if you prefer. Secure with a toothpick if necessary.
Importance of Layering Ingredients
Layering ingredients is essential for achieving a harmonious blend of flavors and textures. By starting with the heartier roasted veggies and finishing with fresh greens and toppings, you create a delightful contrast that makes each bite satisfying. This method also ensures that the wraps don’t become soggy, maintaining a pleasant crunch.
Customizing the Wraps
One of the fantastic aspects of these pita wraps is their versatility. You can customize them to suit your personal taste or dietary preferences. Consider adding protein options like grilled chicken, chickpeas, or tofu for a more filling meal. You can also experiment with different sauces or dressings based on what you enjoy most. The combinations are endless!
Serving Suggestions
When it comes to presenting your colorful mini roasted veggie pita wraps, creativity can enhance the dining experience. Here are some ideas to serve these wraps beautifully:
Creative Presentation Ideas
– Platter Style: Arrange the wrapped pitas on a large platter, garnished with fresh herbs or a sprinkle of sesame seeds for an inviting display.
– Individual Servings: Cut the wraps in half and secure them with toothpicks for easy handling. Serve them on small plates with a side of dipping sauce.
– Accompaniments: Consider serving your pita wraps alongside a vibrant side salad, such as a cucumber-tomato salad or a mixed greens salad with a light vinaigrette. This adds freshness and complements the wraps perfectly.
Pairing Options
Enhancing your meal with the right sides can elevate the entire experience. Here are some pairing options:
– Dips: Serve with a small bowl of hummus, tzatziki, or a spicy yogurt sauce for dipping.
– Chips: Pair with baked pita chips or vegetable chips for a crunchy texture contrast.
– Beverages: A refreshing beverage like iced tea, lemonade, or a light white wine can complement the flavors of the wraps.
Occasion Ideas for Serving
These colorful mini roasted veggie pita wraps are perfect for various occasions, including:
– Lunch: Whether at home or on-the-go, these wraps make for a filling yet healthy lunch option.
– Picnics: Pack them for a picnic; they travel well and are easy to eat without utensils.
– Gatherings: Ideal for casual gatherings or parties, they can be a fun and interactive way for guests to create their own wraps.
Nutritional Analysis
Understanding the nutritional value of your meals is essential for maintaining a balanced diet. Here’s a breakdown of the nutritional profile of the colorful mini roasted veggie pita wraps.
Nutritional Value Per Serving
– Calories: Approximately 250-300 calories (depending on ingredients)
– Protein: 8-12 grams (with added protein sources)
– Carbohydrates: 40-45 grams
– Fiber: 8-10 grams (especially with whole wheat pita)
– Fat: 8-10 grams (based on added ingredients like avocado or cheese)
Macronutrient and Vitamin Balance
These wraps provide a balanced mix of macronutrients. The fiber from whole wheat pita and roasted vegetables aids digestion and keeps you feeling full. Additionally, the variety of vegetables contributes to a rich source of vitamins A, C, and K, along with essential minerals.
Benefits of Plant-Based Meals
Incorporating more plant-based meals, like these colorful mini roasted veggie wraps, into your diet can lead to numerous health benefits. Plant-based diets have been linked to lower risks of chronic diseases, improved heart health, and better weight management. Furthermore, they are often more sustainable and environmentally friendly.
Conclusion
In summary, the colorful mini roasted veggie pita wraps offer a delightful combination of health, flavor, and versatility. They are not only visually appealing but also packed with nutrients, making them a fantastic choice for any meal. Whether for lunch, a picnic, or a gathering, these wraps are sure to impress.
I encourage you to try this recipe and experience the joy of cooking with fresh, seasonal ingredients. Embrace the vibrant colors and flavors of your veggies, and enjoy the satisfaction that comes from creating a delicious, healthy meal. Happy cooking!