
Introduction to Delicious Pumpkin Banana Snack Bars
In the realm of wholesome snacks, few treats can rival the delightful combination of pumpkin and banana. These Delicious Pumpkin Banana Snack Bars not only tantalize your taste buds but also pack a nutritious punch. With their moist texture and rich flavors, they make for the ideal snack for both kids and adults alike. Whether you’re looking for a quick breakfast option or a healthy treat to satisfy your sweet tooth, these bars offer a perfect balance of taste and nourishment.
The fusion of pumpkin and banana isn’t just a culinary delight; it’s a harmonious pairing that brings together the earthy sweetness of pumpkin puree and the natural sugars found in ripe bananas. This recipe is not only easy to prepare but also provides a wonderful opportunity to introduce nutritious ingredients into your diet. As you embark on the journey of creating these snack bars, you’ll discover how simple it can be to whip up a healthy treat that doesn’t compromise on flavor.
In this article, we will guide you through the recipe with detailed instructions, nutritional insights, and the benefits of the key ingredients. By the end, you’ll be equipped to recreate this delicious snack in your own kitchen, enhancing your repertoire of healthy recipes.
Understanding the Key Ingredients
Before diving into the recipe, it’s essential to understand the significance of the ingredients that contribute to the deliciousness and health benefits of Pumpkin Banana Snack Bars. Each component plays a critical role not only in flavor but also in nutritional value.
Exploring the Nutritional Benefits of Bananas
Bananas are a staple in many households for good reason. They are rich in potassium, which is vital for heart health and maintaining proper muscle function. Additionally, bananas are a great source of dietary fiber, which aids in digestion and helps keep you feeling full longer. Their natural sweetness means that you can reduce the need for added sugars in recipes, making them an ideal ingredient for healthier baking. The creamy texture of ripe bananas also contributes to the moistness of the snack bars, ensuring that they remain tender and flavorful.
The Power of Pumpkin Puree
Pumpkin puree is a nutritional powerhouse that is low in calories yet high in essential vitamins, particularly vitamins A and C. Vitamin A is crucial for maintaining good vision and a healthy immune system, while vitamin C is an antioxidant that supports skin health and boosts your immune response. In addition to its vitamin content, pumpkin is rich in fiber, which promotes digestive health and helps regulate blood sugar levels. Incorporating pumpkin into your diet can contribute to a balanced and healthy lifestyle, making it an excellent choice for these snack bars.
Almond Butter vs. Other Nut Butters
For the fat component of the recipe, almond butter is often favored over other nut butters. Almond butter is packed with healthy fats and protein, making it a nutritious addition that enhances satiety. Compared to peanut butter, almond butter has a higher content of vitamins and minerals, including vitamin E and magnesium. Moreover, for those with nut allergies, sunflower seed butter serves as an excellent alternative, providing similar health benefits without the risk of an allergic reaction. Choosing the right nut butter can elevate the taste and health profile of your Pumpkin Banana Snack Bars significantly.
The Sweetening Agents: Honey and Maple Syrup
Natural sweeteners like honey and maple syrup not only enhance the flavor of the snack bars but also come with their own health benefits. Honey is known for its antimicrobial properties and can aid in digestion, while maple syrup is rich in antioxidants and contains essential minerals such as manganese and zinc. When selecting a sweetening agent, it’s important to consider your dietary needs. For those avoiding refined sugars, both honey and maple syrup provide healthier alternatives that contribute to the overall flavor of the bars without the guilt.
Step-by-Step Guide to Making Pumpkin Banana Snack Bars
Now that we’ve covered the essential ingredients and their benefits, let’s get into the nitty-gritty of preparing these delicious snack bars. The following steps will ensure that your baking experience is smooth and enjoyable, resulting in perfectly moist and flavorful bars.
Preparing Your Workspace and Ingredients
Before you start baking, it’s crucial to prepare your workspace and gather all the necessary ingredients. A well-organized kitchen can make the process more efficient and enjoyable. Begin by clearing your countertop and ensuring you have enough space to work. The essential tools and utensils for this recipe include a mixing bowl, measuring cups, a spatula, and a baking pan. You may also want to have a whisk on hand for mixing the wet ingredients. Having everything organized will help you focus on creating the perfect snack bars without unnecessary distractions.
Preheating the Oven for Optimal Baking
Once your workspace is set up, the next step is to preheat your oven. Preheating is a critical part of baking; it ensures that the bars cook evenly and rise properly. Set your oven to 350°F (175°C) for this recipe, which is the ideal temperature for baking these snack bars. Preheating your oven also allows the baking soda or baking powder to activate properly, resulting in a light and fluffy texture. While the oven warms up, you can move on to mixing your ingredients.
Mixing the Wet Ingredients for a Flavorful Base
In a mixing bowl, start by mashing your ripe bananas. The riper the bananas, the sweeter and more flavorful your bars will be. Aim for a smooth consistency, as this will help integrate the other wet ingredients more easily. Next, add in the pumpkin puree, almond butter, and your choice of sweetener—honey or maple syrup. Mixing these ingredients thoroughly creates a flavorful base that will infuse your bars with moisture and taste. Be sure to combine them well to avoid clumps and achieve a uniform mixture.
Combining Dry Ingredients for Perfect Texture
While you’re working on the wet ingredients, it’s also time to prepare your dry ingredients. In a separate bowl, combine whole wheat flour, oats, baking soda, and any spices you wish to include, such as cinnamon or nutmeg. These spices will not only enhance the flavor profile but also add warmth and richness to the bars. Whisk the dry ingredients together to ensure they are evenly distributed, which is key for achieving the perfect texture. Once both mixtures are ready, you can proceed to combine them, creating a delicious batter that will transform into your Pumpkin Banana Snack Bars.
Stay tuned for the next part of this article, where we will guide you through the final steps of assembling and baking your bars, along with tips for storing and serving them!
{{image_2}}
The Role of Oats in Providing Structure
Oats are a staple in many baked goods, and for a good reason. They provide essential structure and chewiness to your Pumpkin Banana Snack Bars. In this recipe, rolled oats are key to achieving the right texture, ensuring that the bars hold together well without becoming too dense. Oats absorb moisture, which helps to keep the bars from drying out, and they also contribute to the overall nutritional profile by adding fiber and heart-healthy whole grains. When selecting oats, choose old-fashioned rolled oats for the best results, as they will lend the perfect balance of texture and chewiness.
Why It’s Crucial to Whisk Dry Ingredients Thoroughly
Before diving into mixing your wet and dry ingredients, it’s essential to whisk your dry ingredients thoroughly. This step ensures even distribution of leavening agents like baking powder and baking soda, which are vital for creating the right rise and texture in your snack bars. When the dry ingredients are combined properly, you reduce the likelihood of any clumps forming in the batter, resulting in a smoother texture. Taking the time to whisk together your flour, oats, spices, and baking soda helps to create a uniform mixture, setting the foundation for a perfectly baked bar.
Folding Techniques: Merging Wet and Dry Ingredients
Best Practices for Gentle Mixing
Once your dry ingredients are whisked together, it’s time to combine them with the wet ingredients. A crucial step in this process is mastering the folding technique. Instead of vigorously stirring, which can lead to overmixing, use a spatula to gently fold the dry ingredients into the wet mixture. Start by adding a portion of the dry ingredients to the wet ingredients, then use the spatula to scoop from the bottom and fold over the top. Rotate the bowl as you fold to ensure even mixing, while being careful not to deflate the batter too much.
Avoiding Overmixing for Soft, Moist Bars
Overmixing is the nemesis of soft, moist baked goods. With Pumpkin Banana Snack Bars, you want to maintain the light and tender texture that comes from the right balance of ingredients. As you fold, stop as soon as you see no dry flour streaks. It’s perfectly okay if there are a few lumps in your batter; this will help keep the bars soft and chewy. Remember, a little bit of care and attention during this stage can make a significant difference in the final product.
Incorporating Add-Ins: Nuts and Chocolate Chips
Exploring Variations and Personal Preferences
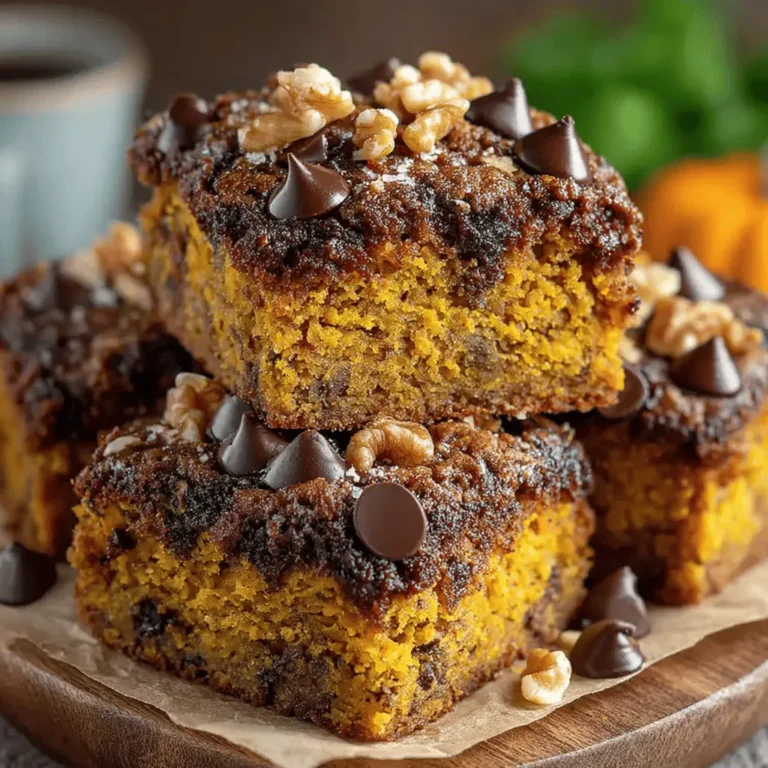
To elevate your Pumpkin Banana Snack Bars, consider adding in some personal touches with nuts and chocolate chips. Chopped walnuts or pecans add a delightful crunch and nutty flavor that complements the sweetness of the bananas and pumpkin. If you’re a chocolate lover, a handful of semi-sweet or dark chocolate chips can transform your bars into a delightful treat. You can also experiment with other add-ins like dried fruit, coconut flakes, or even seeds for an extra nutritional boost. The beauty of this recipe lies in its versatility, allowing you to customize it to suit your taste.
The Impact of Texture on the Overall Snacking Experience
The texture of your bars plays a crucial role in the overall snacking experience. The combination of chewy oats, moist pumpkin, and any added crunch from nuts or chocolate creates a harmonious blend that is both satisfying and delicious. When choosing your add-ins, aim for a balance that enhances the texture without overwhelming the base flavors. Play around with different combinations to find your perfect mix, and don’t hesitate to get creative!
Pouring and Leveling the Batter
Techniques for Even Distribution in the Baking Dish
Once your batter is mixed and ready to go, it’s time to pour it into the prepared baking dish. Use a spatula to transfer the batter, making sure to scrape every last bit from the bowl to ensure that nothing goes to waste. To achieve an even distribution, pour the batter into the center of the dish and gently spread it out towards the edges. This technique helps to minimize air pockets and ensures that the bars bake evenly.
The Significance of Using Parchment Paper
Lining your baking dish with parchment paper is a game-changer for easy removal and cleanup. By leaving some overhang on the sides, you create convenient “handles” that make it easy to lift the bars out after baking. This not only prevents the bars from sticking but also helps maintain their shape while cutting. If you don’t have parchment paper on hand, you can grease the dish generously, but parchment is highly recommended for the best results.
Baking to Perfection
Recognizing the Signs That Your Bars Are Ready
Baking is a science, and knowing when your bars are perfectly baked is crucial. For Pumpkin Banana Snack Bars, look for a golden-brown top and a slight puffiness. The edges should be set while the center might still have a slight jiggle; this is normal as the bars will continue to firm up as they cool. Avoid opening the oven door too frequently, as this can cause the temperature to fluctuate.
The Importance of Toothpick Tests for Doneness
A reliable method to check for doneness is the toothpick test. Insert a toothpick into the center of the bars, and if it comes out clean or with just a few moist crumbs clinging to it, your bars are ready to come out of the oven. If it comes out with wet batter, give them a few more minutes and check again. Remember, every oven is different, so keep an eye on the baking time and adjust as needed.
Cooling and Slicing for Enjoyment
Why Cooling Is Crucial Before Cutting
After baking, it’s essential to allow your Pumpkin Banana Snack Bars to cool in the pan for at least 10-15 minutes before attempting to cut them. This cooling period helps the bars set, making them easier to slice without crumbling. If you try to cut them too soon, you risk losing their perfect shape and texture, leading to a crumbly mess. After the initial cooling, transfer the bars to a wire rack to cool completely before slicing.
Ideas for Serving and Presentation
Once cooled, you can cut your bars into squares or rectangles, depending on your preferred size. For a delightful presentation, consider dusting them with a sprinkle of powdered sugar or drizzling a bit of chocolate or nut butter on top. These bars are perfect for enjoying as a snack on their own, paired with a cup of coffee or tea, or even served as a healthy dessert option. They also make a fantastic addition to lunch boxes or picnics, providing a nutritious, satisfying treat that everyone will love.
Storing Your Pumpkin Banana Snack Bars
Best Practices for Storing
To keep your Pumpkin Banana Snack Bars fresh for as long as possible, store them in an airtight container at room temperature. If you live in a particularly warm or humid environment, it’s best to refrigerate them to maintain their freshness. When properly stored, these bars can remain delicious for up to a week. If you want to keep them for longer, consider freezing them.
The Role of Airtight Containers in Preserving Flavor
Airtight containers are essential for preserving the flavor and moisture of your snack bars. When exposed to air, baked goods can dry out quickly, losing their appealing texture and taste. By using a quality airtight container, you ensure that your bars remain soft and flavorful, ready to enjoy whenever the craving strikes.
Shelf Life and Reheating Suggestions
When stored correctly, your Pumpkin Banana Snack Bars will last about 5-7 days at room temperature and up to 3 months in the freezer. If you decide to freeze them, wrap each bar individually in plastic wrap and then place them in an airtight container or freezer bag. To reheat, simply thaw at room temperature or microwave for a few seconds until warmed through. This method helps to revive their soft, fresh-baked texture without compromising flavor.
Conclusion: The Joy of Homemade Pumpkin Banana Snack Bars
In conclusion, making your own Delicious Pumpkin Banana Snack Bars is not only simple but also rewarding. These bars offer a delightful way to incorporate healthier ingredients into your snacking routine while satisfying cravings for something sweet. With their rich flavors, nutritional benefits, and versatility, they are bound to become a favorite in your home. Enjoy the process of baking and the delectable results that follow, proving that healthy snacks can indeed be delicious!
