Golden Cornflake-Crusted Chicken Fingers: A Deliciously Healthy Alternative
If you’re on the hunt for a delightful dish that combines flavor, texture, and nutrition, look no further than Golden Cornflake-Crusted Chicken Fingers. This recipe transforms the classic chicken finger into a health-conscious alternative that doesn’t skimp on taste. Unlike traditional fried chicken fingers, which can be heavy and greasy, this baked version offers a crispy, golden coating that both kids and adults will love. The unique crunchiness of crushed cornflakes not only adds a satisfying texture but also elevates the flavor profile, making it a standout choice for a variety of occasions.
Whether you’re preparing a casual family dinner or looking for a crowd-pleasing snack for game day, these chicken fingers are incredibly versatile. They can be served with an array of dipping sauces, paired with fresh salads, or enjoyed on their own as a tasty finger food. With a few simple ingredients and straightforward preparation, you’ll find that making these chicken fingers at home is both fun and rewarding.
Understanding the Ingredients
To create the perfect Golden Cornflake-Crusted Chicken Fingers, it’s essential to understand how each ingredient contributes to the overall dish. Here’s a breakdown of the key components:
The Core Ingredient: Chicken Breast
At the heart of this recipe lies boneless, skinless chicken breasts. Lean and versatile, chicken breasts are a popular choice among health-conscious cooks. They are rich in protein, which is vital for muscle building and repair, and they contain fewer calories and fat compared to other cuts of chicken. Additionally, chicken breasts absorb marinades beautifully, enhancing the overall flavor of the dish. When properly cooked, they remain juicy and tender, making them an ideal base for this crunchy coating.
The Marinade: Buttermilk vs. Yogurt
Next up is the marinade, which plays a crucial role in tenderizing the chicken and infusing it with flavor. You have the option to choose between buttermilk and plain yogurt. Both ingredients are excellent choices, but they offer slightly different benefits.
Buttermilk is a traditional marinade that adds a tangy flavor while helping to break down the proteins in the chicken, resulting in a more tender bite. On the other hand, plain yogurt, particularly Greek yogurt, provides a similar tenderizing effect while also offering a thicker consistency that can cling to the chicken effectively. The choice between the two often comes down to personal preference, but either option will work wonderfully for this recipe.
Seasoning Essentials
No chicken dish is complete without a well-thought-out seasoning blend. Garlic powder, onion powder, smoked paprika, salt, and black pepper come together to create a flavor profile that complements the cornflake coating beautifully.
– Garlic powder and onion powder add a savory depth to the chicken, enhancing its overall taste.
– Smoked paprika introduces a subtle smokiness that elevates the dish, giving it a hint of complexity.
– Salt and black pepper serve as essential seasonings, ensuring that the chicken is well-balanced and flavorful.
By seasoning the chicken properly, you set the foundation for a deliciously satisfying meal.
The Crunch Factor: Cornflakes
The star of this recipe is undoubtedly the cornflakes. When crushed, they create a light and airy coating that provides a satisfying crunch when baked. Unlike traditional breadcrumbs, which can sometimes become soggy, cornflakes maintain their crispiness, even after cooking. This unique texture not only enhances the eating experience but also offers a visually appealing golden crust that is sure to catch the eye.
Cornflakes are also a convenient option, as they are readily available in most grocery stores and can be easily crushed at home or purchased pre-crushed. Their mild flavor allows the chicken and seasonings to shine, making them the perfect choice for this dish.
Binding Agents: Eggs and Flour
To ensure that the cornflake coating adheres properly to the chicken, we need binding agents—specifically, eggs and flour.
– Flour acts as the first layer in the breading process, providing a dry surface for the egg to stick to. This initial coating helps create a barrier that keeps the cornflake crust intact during baking.
– Eggs serve as a glue, allowing the crushed cornflakes to adhere firmly to the chicken. The protein in the eggs also contributes to the overall structure of the coating, helping it to set up nicely in the oven.
Together, these binding agents ensure that each chicken finger is coated evenly and retains its crunchy exterior throughout cooking.
Step-by-Step Instructions for Golden Cornflake-Crusted Chicken Fingers
Now that we’ve covered the essential ingredients and their roles, it’s time to dive into the preparation process. Follow these easy-to-follow steps to create your very own Golden Cornflake-Crusted Chicken Fingers:
1. Preparation of Chicken: Start by cutting boneless, skinless chicken breasts into strips. Aim for uniform sizes to ensure even cooking. Pat the chicken dry with paper towels to remove excess moisture, which helps the marinade stick better.
2. Marinate the Chicken: In a large bowl, combine your choice of buttermilk or plain yogurt with the seasoning mix (garlic powder, onion powder, smoked paprika, salt, and black pepper). Add the chicken strips to the marinade, ensuring they are fully submerged. Cover the bowl and let the chicken marinate in the refrigerator for at least 30 minutes, or up to overnight for maximum flavor and tenderness.
3. Preheat the Oven: As you prepare the chicken, preheat your oven to 400°F (200°C). This ensures that the chicken fingers will bake evenly and achieve a crispy texture.
4. Prepare the Breading Station: Set up a breading station with three shallow dishes. In the first dish, add all-purpose flour. In the second dish, beat a couple of eggs until combined. In the third dish, place crushed cornflakes, adding more seasoning if desired for extra flavor.
5. Coat the Chicken: Remove the marinated chicken from the refrigerator. One at a time, take each strip of chicken and coat it in flour, shaking off any excess. Next, dip the floured chicken into the beaten eggs, allowing any extra egg to drip off. Finally, place the chicken in the crushed cornflakes, pressing down gently to ensure an even coating.
6. Arrange on Baking Sheet: Line a baking sheet with parchment paper or lightly grease it to prevent sticking. Arrange the coated chicken fingers on the sheet, ensuring they are spaced apart for even cooking.
7. Bake: Place the baking sheet in the preheated oven and bake for about 15-20 minutes, flipping the chicken fingers halfway through. The chicken should be cooked through and the coating should be golden brown and crispy.
With these steps, you’re well on your way to creating Golden Cornflake-Crusted Chicken Fingers that will impress family and friends alike. The combination of tender, flavorful chicken and a crunchy, golden exterior makes these baked chicken fingers a truly delightful dish that is sure to become a favorite in your household.
{{image_2}}
Marinating the Chicken
To achieve maximum flavor in your Golden Cornflake-Crusted Chicken Fingers, marinating the chicken is a crucial step. Start by cutting your chicken breasts into strips about 1 inch wide. For the marinade, mix together buttermilk, garlic powder, onion powder, and a pinch of salt and pepper in a large bowl. The acidity of the buttermilk will tenderize the chicken while infusing it with flavor.
Place the chicken strips into the marinade, ensuring they are fully submerged. Cover the bowl with plastic wrap or transfer the chicken to a resealable plastic bag to prevent any spills. For best results, marinate the chicken for at least 30 minutes, but if time allows, aim for 2-4 hours. The longer the chicken sits in the marinade, the more flavorful and tender it will become. This step is essential to ensure that every bite of your chicken fingers is juicy and packed with flavor.
Setting Up the Breading Station
A well-organized breading station is key to creating perfectly coated chicken fingers. Begin by preparing three shallow dishes. In the first dish, place all-purpose flour seasoned with salt and pepper. This will create a base layer that helps the egg adhere to the chicken. In the second dish, beat a couple of eggs with a splash of water to create an egg wash. Finally, in the third dish, pour in crushed cornflakes, ideally coarsely crushed for texture. You can use a rolling pin to crush the cornflakes directly in the box or place them in a sturdy zip-lock bag.
Arrange the dishes in a straight line: flour, egg wash, and cornflakes. This assembly line approach makes the breading process more efficient and minimizes mess. Have a clean plate or baking sheet nearby to place the breaded chicken fingers before baking. This setup not only streamlines the process but also keeps your workspace tidy, allowing you to focus on creating crispy chicken fingers.
Breading Technique
Now that your chicken is marinated and your breading station is set up, it’s time to get breading! Begin by removing a chicken strip from the marinade, allowing any excess liquid to drip off. Dredge the chicken in the flour, making sure to coat it evenly. Shake off any excess flour before dipping the chicken into the egg wash. This step is essential, as the egg wash acts as a glue for the cornflake coating.
Once coated in egg, transfer the chicken strip to the crushed cornflakes. Press the cornflakes firmly onto the chicken, ensuring an even and thorough coating. This is where the magic happens—pressing the cornflakes ensures they adhere better during the baking process, resulting in a crunchier texture.
After breading, place the chicken fingers on the prepared plate or baking sheet. Repeat the process with the remaining chicken strips until all are coated. Be sure to work efficiently to avoid the cornflakes becoming soggy.
Baking for Perfection
Baking is the final step in creating your Golden Cornflake-Crusted Chicken Fingers. Preheat your oven to 425°F (220°C) for optimal cooking conditions. Cooking at a high temperature ensures that the chicken cooks through while achieving that coveted crispy texture.
Line a baking sheet with parchment paper for easy cleanup, and lightly spray it with cooking spray or brush it with a bit of oil. This step is important as it helps to further crisp up the coating. Arrange the chicken fingers in a single layer, ensuring they aren’t touching. This allows for even cooking and prevents sogginess.
Bake the chicken fingers in the preheated oven for about 15-20 minutes, flipping them halfway through to ensure even browning. The chicken is done when it reaches an internal temperature of 165°F (74°C) and the cornflake coating is golden brown and crispy. Once baked, let them cool for a few minutes before serving, as this will help retain their crispiness.
Serving Suggestions
Golden Cornflake-Crusted Chicken Fingers are versatile and can be served in numerous ways. For a casual family meal, serve them alongside a colorful salad or steamed vegetables to balance the dish. You can also create a fun platter by pairing them with various dipping sauces and sides like sweet potato fries or coleslaw.
For a party or gathering, consider serving the chicken fingers as appetizers. Arrange them on a large serving platter with toothpicks for easy snacking. A fun idea is to create a “chicken finger bar,” where guests can customize their dishes with different sauces and toppings, making it an interactive dining experience.
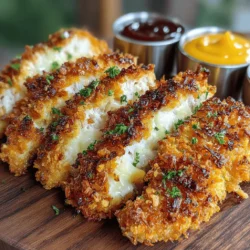
Ideal Dipping Sauces
The right dipping sauce can elevate your chicken fingers to new heights. Here are a few popular options that perfectly complement the crunchy cornflake coating:
– Honey Mustard: The sweetness of honey paired with the tangy mustard creates a delightful balance, making it a classic choice.
– Barbecue Sauce: A smoky barbecue sauce adds depth to the flavor profile and pairs wonderfully with the crispy texture.
– Ranch Dressing: Creamy ranch dressing is a fan favorite that provides a cool contrast to the warm chicken fingers.
– Sriracha Mayo: For those who enjoy a kick, mix mayonnaise with Sriracha for a spicy accompaniment that enhances the savory flavor of the chicken.
Presentation Tips
Presentation can make a simple dish feel gourmet. Consider these creative ways to display your Golden Cornflake-Crusted Chicken Fingers:
1. Garnish with Fresh Herbs: Sprinkle fresh parsley or cilantro over the chicken fingers for a pop of color and freshness.
2. Use Fun Plates: Serve the chicken fingers on colorful or themed plates to enhance the visual appeal.
3. Add Sides for Color: Include colorful sides like cherry tomatoes, carrot sticks, or cucumber slices on the platter for an eye-catching presentation.
4. Serve in Cones: For a whimsical touch, serve the chicken fingers in paper cones or cups, making them easy for guests to grab and enjoy.
5. Create a Dipping Station: Arrange the dipping sauces in small bowls around the chicken fingers, inviting guests to mix and match as they please.
Nutritional Information
Not only are Golden Cornflake-Crusted Chicken Fingers delicious, but they also offer nutritional benefits compared to traditional fried options. Each serving provides a good source of protein, essential for muscle repair and growth. By baking instead of frying, you significantly reduce the amount of added fat and calories, making this recipe a healthier choice for families. Additionally, using cornflakes adds fiber to the dish, which is beneficial for digestion.
Conclusion
Golden Cornflake-Crusted Chicken Fingers are a delightful and healthier alternative to traditional fried chicken fingers. With their crunchy cornflake coating and juicy chicken, they are sure to please kids and adults alike. The ease of preparation allows for a quick weeknight meal or a fun weekend gathering. By marinating the chicken, setting up an efficient breading station, and baking to perfection, you can create a satisfying dish that feels indulgent yet wholesome.
Cooking at home provides an opportunity to bond with loved ones over delicious meals. So why not try this recipe? Enjoy the fun of making these chicken fingers together, and relish in the satisfaction of sharing a homemade dish that everyone will love. Whether for a family dinner or a casual get-together, these chicken fingers are a surefire hit that will make mealtime memorable.