
Heavenly Honey Butter Crescent Rolls: A Sweet and Savory Delight
Introduction
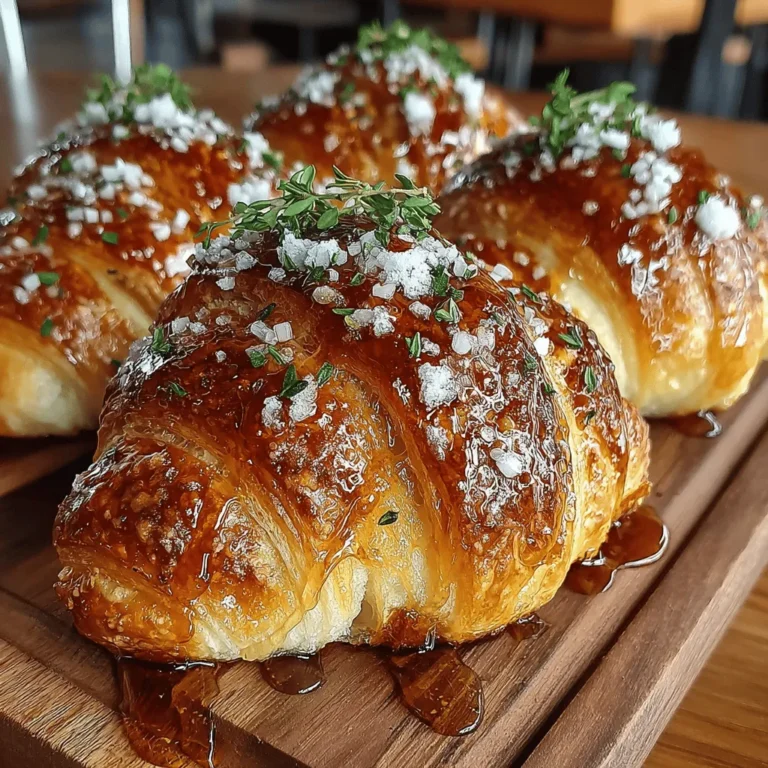
Baking can be a joyous activity, especially when it results in the creation of something as delightful as Heavenly Honey Butter Crescent Rolls. These delectable rolls are not just a feast for the eyes; they’re a dream for the palate. Soft, flaky, and infused with a luscious honey butter mixture, these crescent rolls are a versatile addition to any meal, whether you’re enjoying them at breakfast, serving them at a brunch gathering, or including them as a delightful side dish for dinner. With a subtle hint of cinnamon and a sprinkle of sea salt to finish, they are sure to become a favorite among family and friends.
The Allure of Crescent Rolls
Crescent rolls have a rich culinary history and are beloved for their versatility. Originating in Austria, these rolls have evolved over time and are now a staple in kitchens around the world. Their signature shape and flaky texture make them an appealing choice not just for baking novices but also for experienced home bakers. The ease of preparation, combined with the ability to serve them in various ways—whether as a breakfast item, an accompaniment to soups and salads, or even as a base for sandwiches—adds to their widespread popularity.
What sets crescent rolls apart is not just their buttery flavor and flaky layers but also their ability to adapt to different ingredients and flavor profiles. This adaptability allows them to shine in many culinary contexts, making them a favorite for those looking to impress without spending hours in the kitchen.
The Perfect Companion: Honey Butter
At the heart of this recipe lies the rich, sweet, and creamy honey butter that elevates the crescent rolls to new heights. This delightful concoction is made from high-quality butter and pure honey, which together create a perfect harmony of flavors and textures. The sweet notes of honey complement the buttery richness, resulting in a spread that is both luxurious and comforting.
Making honey butter at home is not just easy—it’s also a way to control the quality of the ingredients. When you opt for homemade honey butter, you can select the finest butter and the purest honey, ensuring that your rolls are not only delicious but also made from wholesome components. In contrast, store-bought versions often contain additives and preservatives that can detract from the natural flavors.
Ingredients Overview
Before diving into the baking process, let’s take a closer look at the key ingredients that will bring these Heavenly Honey Butter Crescent Rolls to life.
– Crescent Roll Dough: The foundation of your rolls. You can use store-bought dough for convenience or make your own from scratch if you’re feeling adventurous. Either way, the dough should be soft and pliable to achieve the perfect flaky texture.
– Butter: Opt for high-quality unsalted butter for the honey butter mixture. Its creamy texture and rich flavor are essential for creating that melt-in-your-mouth experience.
– Honey: Choose pure, raw honey if possible. It not only adds sweetness but also contributes to the chewy texture of the rolls.
– Cinnamon: A dash of cinnamon not only enhances the flavor profile but also adds a warm, inviting aroma that will fill your kitchen as they bake.
– Sea Salt: A sprinkle of flaky sea salt on top of the baked rolls balances the sweetness and enhances the overall flavor.
– Optional Ingredients: Consider adding a splash of vanilla extract or a hint of nutmeg to the honey butter for an extra layer of flavor. You might also want to experiment with toppings, such as chopped nuts or dried fruit, to customize your crescent rolls.
Step-by-Step Guide to Making Heavenly Honey Butter Crescent Rolls
Now that you have an understanding of the ingredients, let’s get started on the step-by-step process of creating these mouthwatering rolls.
Preparing the Honey Butter
The first step in making Heavenly Honey Butter Crescent Rolls is to prepare the honey butter mixture.
1. Gather Your Ingredients: Start with softened unsalted butter and pure honey. Make sure the butter is at room temperature, as this will help achieve a smooth and creamy consistency.
2. Mixing: In a medium bowl, combine about 1/2 cup of softened butter with 1/4 cup of honey. Use a hand mixer or a whisk to blend the ingredients together until they are fully incorporated and creamy.
3. Adding Flavor: If you’re opting to include cinnamon, add about 1 teaspoon to the mixture. For those who enjoy a hint of vanilla, incorporate 1/2 teaspoon of pure vanilla extract as well.
4. Achieving the Right Consistency: The honey butter should be creamy but still spreadable. If it’s too thick, you can add a little more honey or butter until you reach the desired texture.
5. Taste Test: Don’t forget to taste your honey butter! Adjust the sweetness or flavorings to suit your preference, keeping in mind that it will complement the rolls beautifully.
Prepping the Oven and Baking Sheet
While the honey butter is coming together, it’s essential to prepare your baking environment to ensure a seamless baking experience.
1. Preheat the Oven: Preheat your oven to 375°F (190°C). This step is crucial, as starting with a hot oven helps the dough rise properly and develop that signature flaky texture.
2. Prepare the Baking Sheet: Line a baking sheet with parchment paper. This not only helps with easy cleanup but also prevents the rolls from sticking to the pan, ensuring they come out perfectly golden and intact.
3. Gather Baking Tools: Have a sharp knife or pizza cutter on hand for cutting the dough, as well as a pastry brush for applying the honey butter before baking.
Rolling the Dough
With the honey butter prepared and the baking environment set, it’s time to roll out the crescent dough.
1. Unroll the Dough: Carefully unroll the crescent roll dough onto a clean, lightly floured surface. If you’re using homemade dough, roll it out into a large triangle shape, about 1/8 inch thick.
2. Cutting the Triangles: If you’re working with store-bought dough, it typically comes pre-scored. If not, use your knife or pizza cutter to slice the dough into triangles. The larger the triangles, the bigger the rolls will be.
3. Shaping the Rolls: Starting from the wide end of each triangle, gently roll the dough towards the pointed end. Tuck the tip underneath the roll to help it maintain its shape while baking.
4. Placing on the Baking Sheet: Arrange the rolled crescent rolls on the prepared baking sheet, leaving enough space between each roll to allow for expansion during baking.
As you embark on this baking adventure, remember that the Heavenly Honey Butter Crescent Rolls you’re creating will not only be a treat for your taste buds but also a source of warmth and joy shared around the dining table. With each step, you’re crafting a delicious experience that’s sure to leave a lasting impression.
{{image_2}}
Spreading the Honey Butter
Once your crescent rolls have baked to golden perfection, it’s time to elevate their flavor with the delightful honey butter. The key to a delicious roll lies not only in the dough but also in how well you spread that sweet, creamy concoction.
Best Practices for Even Distribution of the Honey Butter
1. Timing is Key: Apply the honey butter while the rolls are still warm. This allows the butter to melt slightly and soak into the rolls, enhancing the flavor.
2. Use a Pastry Brush: For a smooth and even application, a pastry brush works wonders. Dip the brush into the honey butter and evenly coat the tops of each roll. Make sure to cover the entire surface to ensure that each bite is as flavorful as the last.
3. Don’t Skimp: Generously apply the honey butter; it’s what makes these rolls heavenly! Start with a light coat, then add more as needed.
Suggestions for Variations in Flavor
While the classic honey butter is delicious on its own, there are numerous ways to customize it:
– Spices: Consider adding a pinch of cinnamon or nutmeg for a warm, cozy flavor. This can be particularly inviting during the colder months.
– Extracts: A drop of vanilla or almond extract can add a unique twist. Mix well into the honey butter before spreading.
– Citrus Zest: For a refreshing touch, incorporate a bit of lemon or orange zest into the honey butter. The citrus notes will provide a delightful contrast to the sweetness.
Shaping the Crescents
Now that your honey butter is ready, let’s focus on rolling and shaping your crescent rolls to perfection.
Step-by-Step Instructions for Rolling the Dough
1. Prepare the Dough: After your dough has risen and is ready to go, turn it out onto a lightly floured surface. Gently flatten it into a rectangle about 1/4 inch thick.
2. Cut the Dough: Using a sharp knife or a pizza cutter, slice the dough into triangles. Aim for a base of about 4 inches wide and a height of 5-6 inches.
3. Rolling the Dough: Starting at the wide end of each triangle, roll the dough towards the point, keeping it tight but not so tight that it tears. The goal is to create a nice spiral shape.
4. Position the Rolls: As you roll each triangle, place it on a baking sheet lined with parchment paper, ensuring that the tip is tucked under the roll to prevent it from unraveling.
How to Ensure Proper Sealing of the Rolls for Baking
To avoid any potential disasters while baking, ensure the rolls are well-sealed:
– Pinch the Seams: After rolling, gently pinch the seams where the dough meets to secure the rolls.
– Resting Period: Let the shaped rolls rest for about 15 minutes before applying the egg wash. This allows them to relax and ensures they will rise nicely in the oven.
Applying the Egg Wash
An egg wash is a simple mixture that gives your crescent rolls that beautiful, glossy finish.
Explanation of the Egg Wash and Its Effect on the Final Product
An egg wash is typically made by beating an egg with a tablespoon of water or milk. Brushing this mixture over the rolls before baking creates a golden-brown crust that enhances the visual appeal of your crescent rolls. The egg proteins coagulate as they bake, leading to a crispy and attractive surface.
Alternatives to Egg Wash for Those with Dietary Restrictions
If you’re looking for alternatives to traditional egg washes, consider the following options:
– Plant-based Milk: Almond milk or soy milk can be brushed on the rolls for a similar effect, though the color may not be as rich.
– Aquafaba: The liquid from a can of chickpeas, known as aquafaba, can be whipped and used as a vegan egg wash. It gives a lovely sheen to baked goods.
Baking to Perfection
With the rolls shaped, sealed, and brushed with an egg wash, it’s time to bake.
Baking Time and Temperature Guidelines
Preheat your oven to 375°F (190°C). Place the baking sheet in the center of the oven and bake the rolls for about 12-15 minutes, or until they are golden brown and puffed.
How to Determine When the Rolls Are Perfectly Golden and Puffed
Keep an eye on your rolls as they bake. The visual cues to look for include:
– A deep golden-brown color across the surface.
– A noticeable puffiness indicating that the dough has risen beautifully.
– If you’re unsure, you can gently lift one of the rolls with a spatula to check the bottom; it should be golden as well.
Finishing Touches
After pulling the crescent rolls from the oven, it’s time to apply some finishing touches to amplify their flavor.
Using Any Remaining Honey Butter for a Delicious Glaze
If you have leftover honey butter, use it to brush over the warm rolls right after they come out of the oven. This adds an additional layer of flavor and moisture.
The Option of Drizzling Additional Honey for Enhanced Sweetness
For those who crave extra sweetness, drizzle some honey over the top of the rolls. This not only enhances the flavor but also adds a beautiful glossy finish.
Garnishing with Fresh Herbs for an Elegant Presentation
If you want to impress your guests, consider garnishing your rolls with finely chopped fresh herbs, such as thyme or rosemary. This will not only elevate the visual appeal but also add a subtle flavor that pairs wonderfully with the sweet honey butter.
Serving Suggestions
Creative Ways to Enjoy Your Crescent Rolls
These heavenly honey butter crescent rolls are incredibly versatile and can be enjoyed in various settings:
– With Breakfast: Serve them warm alongside scrambled eggs and crispy bacon for a delightful breakfast spread.
– As a Side for Lunch: Pair them with a fresh salad or soup. Their sweetness complements savory dishes beautifully.
– At Dinner: Present these rolls as an elegant side to your roasted meats, such as chicken or pork. They work wonderfully to soak up gravies and sauces.
Serving Ideas: From Elegant Brunches to Casual Family Dinners
Whether you are hosting a fancy brunch or a casual family dinner, these crescent rolls can fit any occasion. Serve them in a breadbasket lined with a cloth for a homely touch, or place them on a wooden board for a rustic presentation.
Storage and Reheating Tips
How to Keep Your Rolls Fresh
To keep your heavenly honey butter crescent rolls fresh, follow these best practices:
– Cool Completely: Allow the rolls to cool to room temperature before storing them to prevent moisture buildup.
– Wrap Properly: Store them in an airtight container or wrap them tightly in plastic wrap. This will help maintain their softness.
Reheating Methods to Restore Freshness and Flavor
When you’re ready to enjoy your leftover rolls, you can easily restore their freshness:
– Oven Method: Preheat your oven to 350°F (175°C). Place the rolls on a baking sheet and cover them with aluminum foil to prevent them from browning too much. Heat for about 10-15 minutes until warmed through.
– Microwave Method: For a quick option, place the rolls on a microwave-safe plate and cover with a damp paper towel. Heat in 15-second intervals until warmed to your liking. Be cautious not to overheat, as this can make the rolls tough.
Conclusion
Heavenly Honey Butter Crescent Rolls offer a blend of sweetness and warmth that can elevate any dining experience. Their simple preparation and rich flavors make them a must-try for both novice and experienced bakers. Enjoy these delightful rolls fresh out of the oven or as a delightful accompaniment to your favorite meals. Embrace the art of baking and indulge in the wonderful world of homemade treats that bring joy to your table. Whether served at breakfast, as a side dish, or enjoyed on their own, these crescent rolls are sure to become a beloved staple in your kitchen. So gather your ingredients, roll up your sleeves, and indulge in the sweet satisfaction of homemade crescent rolls.
