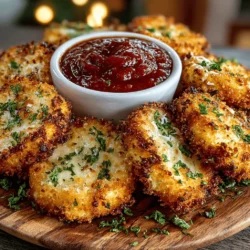
Mini Toasted Ravioli Bites Recipe
When it comes to appetizers that can steal the show at any gathering, Mini Toasted Ravioli Bites stand out as a delightful option. These crispy, bite-sized treats are not only visually appealing but also packed with flavor, making them a favorite for parties, game days, and casual family dinners. Their irresistible crunch, combined with a variety of savory fillings, creates a perfect balance that keeps guests coming back for more.
Homemade appetizers like Mini Toasted Ravioli Bites are essential for creating memorable moments with family and friends. They offer a personal touch that store-bought snacks often lack. Plus, making them from scratch allows you to tailor the flavors and ingredients to suit your guests’ preferences, ensuring that everyone leaves satisfied.
One of the many advantages of using ravioli in this recipe is its versatility. You can experiment with various fillings, whether you prefer classic cheese, hearty meat, or even a blend of vegetables. This flexibility means that you can adapt the recipe to cater to different dietary needs or flavor profiles, making it a fantastic addition to your entertaining repertoire.
Why Mini Toasted Ravioli Bites are a Perfect Choice
The appeal of Mini Toasted Ravioli Bites lies in their delightful combination of textures and flavors. The crispy exterior, achieved through a golden-brown breading, contrasts beautifully with the tender, savory filling inside. This contrast not only enhances the eating experience but also makes them highly addictive.
Moreover, the customizability of these bites is one of their strongest selling points. Whether you’re hosting a gathering for adults or a kid-friendly party, you can choose from a range of fillings. Cheese-stuffed ravioli provide a creamy and rich flavor, while meat-filled options like sausage or beef add a hearty touch. For a lighter spin, consider using vegetable or spinach and ricotta-filled ravioli. This versatility ensures that your Mini Toasted Ravioli Bites will cater to different tastes, making them suitable for any occasion.
These little bites are perfect for various settings, be it a festive holiday party, a lively game day gathering, or a relaxed family dinner. Their finger-food nature makes them easy to serve and enjoy, allowing guests to mingle while savoring each delicious morsel. Plus, they pair beautifully with a variety of dips, enhancing the overall flavor experience.
Ingredients Breakdown
To create the perfect Mini Toasted Ravioli Bites, you’ll need a handful of simple yet essential ingredients. Each component plays a crucial role in achieving that coveted crispy texture and rich flavor.
1. Refrigerated or Frozen Mini Ravioli: The star of the dish, ravioli can be found in both refrigerated and frozen varieties. You can choose from different types, including cheese, meat, or vegetable fillings. If you’re pressed for time, frozen ravioli is a convenient option, while fresh refrigerated ravioli often boasts a more delicate texture.
2. Italian Seasoned Breadcrumbs: Using seasoned breadcrumbs is essential for adding flavor to your bites. The Italian seasoning in the breadcrumbs infuses the dish with aromatic herbs and spices, enhancing the overall taste profile. If you can’t find seasoned breadcrumbs, you can easily make your own by mixing plain breadcrumbs with Italian herbs.
3. All-Purpose Flour: This ingredient is critical for the breading process. It helps the egg adhere to the ravioli, creating a sturdy base for the breadcrumbs to cling to. A light dusting of flour on the ravioli ensures that the coating remains intact during frying.
4. Eggs: Eggs serve as the binding agent in the breading process. They help hold the breadcrumbs in place, ensuring a uniform coating that crisps up beautifully when fried.
5. Parmesan Cheese: For an extra layer of flavor, grated Parmesan cheese can be mixed into the breadcrumbs or sprinkled on top of the ravioli before serving. Its nutty and salty notes elevate the overall taste, making each bite even more satisfying.
6. Seasonings: A blend of garlic powder, onion powder, oregano, salt, and pepper adds depth and complexity to the flavor. These seasonings work harmoniously to complement the fillings in the ravioli, ensuring that every bite is bursting with taste.
7. Cooking Oil: Selecting the right cooking oil is crucial for frying your Mini Toasted Ravioli Bites. Oils with high smoke points, such as canola, vegetable, or peanut oil, are ideal for achieving the perfect crispiness without burning.
8. Marinara Sauce: While not part of the ravioli itself, marinara sauce serves as an excellent dipping option. Its bright tomato flavor balances the richness of the fried ravioli and adds a refreshing element to each bite.
Step-by-Step Instructions for Preparing Mini Toasted Ravioli Bites
Preparing the Ravioli: The first step in making Mini Toasted Ravioli Bites is to prepare the ravioli. Depending on whether you are using frozen or refrigerated ravioli, the cooking method will differ slightly.
– Frozen Ravioli: If you choose to use frozen ravioli, it’s essential to cook them according to the package instructions. Typically, this involves boiling them in salted water until they float, which indicates they are cooked through. This usually takes about 3-5 minutes. Once cooked, carefully remove them from the pot and transfer them to a plate lined with paper towels to absorb excess moisture. Allow them to cool for a few minutes to ensure they are not too hot to handle during the breading process.
– Refrigerated Ravioli: If you opt for refrigerated ravioli, they generally require less cooking time. Bring a pot of salted water to a gentle boil and add the ravioli. They should be cooked for about 2-3 minutes or until they are tender yet firm. Similar to the frozen variety, remove them from the water and let them cool on a paper towel-lined plate.
Cooling Before Breading: Once the ravioli are cooked, it’s crucial to let them cool completely before proceeding to bread them. Cooling helps prevent the breading from becoming soggy and ensures a crispy finish when fried. It also makes handling easier, reducing the risk of tearing the delicate pasta.
As you prepare your ravioli and let them cool, you can begin setting up your breading station, which will streamline the process and ensure a consistent coating on each piece. This preparation will lay the groundwork for turning these delectable bites into a crispy, golden treat that your guests will adore.
Stay tuned for the next part, where we will dive into the breading process and frying techniques that will bring your Mini Toasted Ravioli Bites to life.
{{image_2}}
Setting Up Your Breading Station
Before diving into the breading process, it’s essential to set up an efficient breading station. This will not only streamline the process but also help maintain a clean cooking space. The classic three-dish method is a tried-and-true technique that ensures each ravioli is perfectly coated and ready for frying.
1. Prepare Your Dishes:
– Dish 1: Fill with flour, seasoned with salt and pepper. This will provide the first coat to help the egg adhere.
– Dish 2: Whisk together eggs and a splash of milk in this dish. This mixture will act as a binding agent for the breadcrumbs.
– Dish 3: Place breadcrumbs here. You can use plain, seasoned, or even panko for an extra crunch.
2. Organize the Space:
– Arrange the dishes in order of use: flour first, then egg, and finally breadcrumbs. This helps avoid cross-contamination and keeps your workspace tidy.
– Keep a clean plate handy for the finished breaded ravioli to prevent any mess.
Breading the Ravioli
Now that your station is set up, it’s time to bread the ravioli. This step is crucial for achieving that delightful crunch.
1. Coating Techniques:
– Start by taking a ravioli and gently dredging it in the flour first. Make sure it’s fully coated, shaking off any excess flour. This step is vital as it helps the egg adhere better.
– Next, dip the floured ravioli into the egg mixture, ensuring it’s fully submerged. Allow any excess egg to drip off before moving on to the next step.
– Finally, roll the ravioli in the breadcrumbs, pressing lightly to ensure an even coating. This will create that irresistible crunch when fried.
2. Shaking Off Excess:
– It’s important to shake off excess flour and egg at each stage. Too much coating can lead to uneven frying and soggy ravioli. A light touch is all you need to maintain a crisp texture.
Heating the Oil
With the ravioli breaded, the next step is to heat the oil for frying. Getting the oil temperature right is critical for achieving perfectly toasted ravioli.
1. Optimal Frying Temperature:
– Heat your oil in a deep saucepan or fryer to around 350°F (175°C). This temperature is ideal for frying, ensuring that the ravioli cook quickly and evenly without absorbing too much oil.
– If you don’t have a thermometer, you can check the oil readiness by dropping a small piece of bread into the oil. If it sizzles and browns in about 60 seconds, the oil is ready.
2. Safety Tips:
– Always use a deep-frying thermometer to maintain temperature control, as overheating oil can be dangerous.
– Avoid overcrowding the pan; fry in small batches to maintain oil temperature and ensure even cooking.
Frying the Ravioli
Now comes the exciting part—frying the ravioli! This is where the magic happens, transforming simple ingredients into crispy bites of deliciousness.
1. Frying in Batches:
– Fry the ravioli in small batches, about 4-5 at a time, depending on the size of your pan. Overcrowding can cause the temperature of the oil to drop, resulting in soggy ravioli.
– Fry each batch for about 2-3 minutes, turning occasionally, until golden brown and crispy.
2. Recognizing Doneness:
– The ravioli are done when they are a rich golden-brown color. Keep an eye on them to prevent burning, as frying times may vary based on the size of the ravioli and the heat of the oil.
3. Draining Excess Oil:
– Once fried, use a slotted spoon to transfer the ravioli to a plate lined with paper towels. This will help absorb any excess oil and keep your bites crispy.
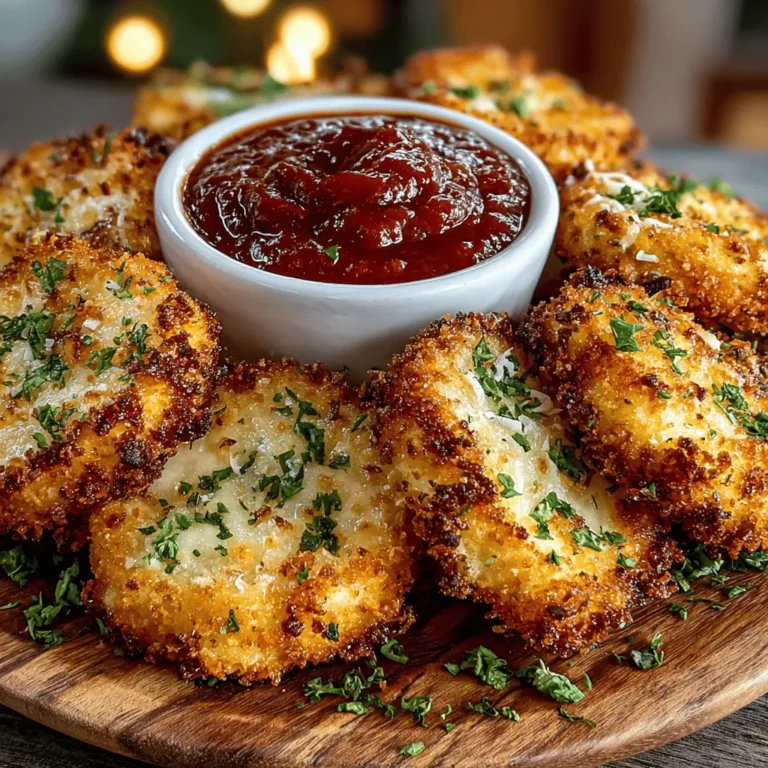
Serving Suggestions for Mini Toasted Ravioli Bites
The final touch is to present your Mini Toasted Ravioli Bites in a way that enhances their appeal. Here are some creative serving ideas:
1. Presentation Ideas:
– Serve the ravioli on a large platter, garnished with fresh parsley or basil for a pop of color. You can also drizzle a little olive oil over the top for added flavor.
– For a fun twist, place the ravioli in small individual serving cups, accompanied by a variety of dips.
2. Dips and Pairings:
– While marinara sauce is a classic accompaniment, consider offering a range of dips. Pesto, ranch dressing, or even a spicy aioli can elevate the flavors and provide variety for your guests.
– For an upscale touch, serve the ravioli with a balsamic reduction drizzled over the top.
3. Enhancing Visual Appeal:
– Use fresh herbs like basil or cilantro to garnish the dish. A sprinkle of grated Parmesan cheese can also add a pleasing touch.
– Consider adding a side of roasted cherry tomatoes or a colorful salad to complete the dish visually and nutritionally.
Nutritional Information
Understanding the nutritional aspects of your Mini Toasted Ravioli Bites is crucial, especially if you’re mindful of dietary needs.
1. Nutritional Overview:
– Each serving of Mini Toasted Ravioli Bites contains carbohydrates, protein, and fats, making them a balanced snack option. However, keep in mind that frying increases the calorie count.
– On average, a serving may contain approximately 250-300 calories, depending on the size and specific ingredients used.
2. Dietary Modifications:
– For those seeking gluten-free options, consider using gluten-free pasta and breadcrumbs. This modification allows more people to enjoy these tasty bites without dietary restrictions.
– Alternatively, for a healthier frying method, you could opt to bake the ravioli instead. Brush them lightly with olive oil and bake at 400°F (200°C) for about 15-20 minutes, turning halfway through, until crispy.
Conclusion
Making Mini Toasted Ravioli Bites is not just a culinary task; it’s an enjoyable experience that brings friends and family together. The process of breading and frying creates a delicious snack that can be customized with various fillings and dips, making it perfect for any occasion.
Don’t hesitate to experiment with different ravioli fillings, from traditional cheese and spinach to innovative combinations like buffalo chicken or roasted vegetables. Each variation can offer a unique spin on this classic dish.
These bite-sized delights are sure to be a hit at your next gathering. Invite your loved ones to share in the fun of making and enjoying these crispy treats. With their delightful crunch and versatile dipping options, Mini Toasted Ravioli Bites are bound to become a favorite in your culinary repertoire.