Refreshing Watermelon Lime Bliss Pops Recipe
As the temperature rises and the sun shines brighter, the craving for cool, refreshing treats becomes nearly irresistible. Summer brings with it a bounty of fruits and flavors, and few indulgences are as satisfying as a homemade popsicle. Among the myriad of options, the Watermelon Lime Bliss Pops stand out as a quintessential summer delight. Not only do they offer a burst of flavor, but they also embody the spirit of health and wellness that comes with using natural ingredients.
In recent years, there has been a growing trend towards healthier snacking options, particularly during the hot months. Store-bought popsicles often come laden with artificial flavors, excessive sugars, and preservatives, making them less desirable for health-conscious individuals. Creating your own popsicles at home allows you to control the ingredients, ensuring that every bite is not only delicious but also nutritious. The Watermelon Lime Bliss Pops are a testament to this philosophy, combining fresh fruits and natural sweeteners to create a guilt-free treat that everyone can enjoy.
Understanding the Ingredients
To truly appreciate the Watermelon Lime Bliss Pops, it’s essential to understand the key ingredients that make this recipe both flavorful and beneficial for your health. Each component plays a vital role in delivering the perfect balance of taste and nutrition.
Watermelon: This juicy fruit is the star of the show. Watermelon is not only a delicious summer staple but also packed with nutrients. It is composed of about 92% water, making it an excellent choice for hydration on hot days. Additionally, watermelon is rich in vitamins A and C, as well as antioxidants like lycopene, which may offer various health benefits, including improved heart health and reduced inflammation. The natural sweetness of watermelon provides a base for the popsicles, eliminating the need for excessive added sugars.
Freshly Squeezed Lime Juice: The addition of freshly squeezed lime juice elevates the flavor profile of the pops. Limes are known for their zesty and refreshing taste, which complements the sweetness of the watermelon beautifully. Beyond flavor, lime juice is packed with vitamin C, an essential nutrient known for its immune-boosting properties. This citrus fruit also aids in digestion and has a low-calorie count, making it a fantastic addition to any summer treat.
Honey or Agave Syrup: To sweeten the mixture naturally, honey or agave syrup can be incorporated. Both options are healthier alternatives to refined sugar, with honey offering antibacterial properties and agave syrup being a low-glycemic sweetener, making it a suitable choice for those monitoring their blood sugar levels. The choice between the two depends on personal preference and dietary restrictions, but either option will add a touch of sweetness without overwhelming the natural flavors of the watermelon and lime.
Salt: Though it may seem unconventional to include salt in a sweet treat, a pinch of salt serves to enhance the overall flavor. It can help balance the sweetness and bring out the natural flavors of the watermelon and lime, creating a more rounded taste experience.
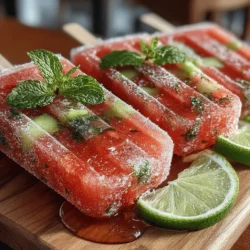
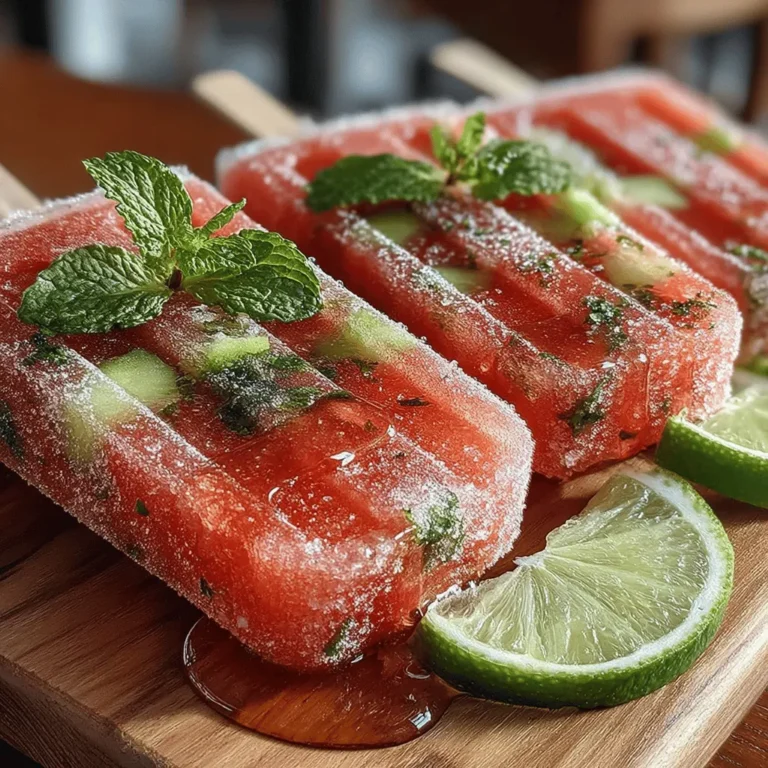
Optional Garnishes: For those looking to add a finishing touch, lime slices and fresh mint leaves serve as delightful garnishes. Not only do they enhance the aesthetic appeal of the pops, making them visually stunning, but they also add extra layers of flavor. Mint, in particular, can provide a refreshing aroma and taste, making each bite even more invigorating.
Step-by-Step Guide to Making Watermelon Lime Bliss Pops
Now that we have a solid understanding of the ingredients, let’s delve into the process of making these delightful pops. The following steps will ensure a smooth and enjoyable experience as you create your Watermelon Lime Bliss Pops.
Preparing the Watermelon
The first step in making your popsicles is selecting the perfect watermelon. When choosing a seedless watermelon, look for one that feels heavy for its size and has a uniform shape. A dull skin indicates ripeness, while a shiny appearance suggests it may be under ripe. Once you’ve selected a sweet, ripe watermelon, it’s time to cut it into cubes.
Begin by washing the outside of the watermelon to remove any dirt or contaminants. Place the watermelon on a sturdy cutting board and use a sharp knife to slice it in half lengthwise. From there, cut each half into quarters and remove the rind, taking care to cut away any white pith. Finally, chop the flesh into cubes, ensuring they are of a size that can easily be blended.
Blending the Mixture
With your watermelon cubes ready, it’s time to blend them into a refreshing puree. Transfer the cubes into a blender or food processor, and blend until the mixture reaches a smooth consistency. It’s important to avoid leaving any large chunks, as these may not freeze well and could affect the texture of your pops. If your blender is having trouble, you can add a small amount of water to facilitate the blending process.
The goal is to create a smooth, vibrant watermelon puree that will serve as the base for your popsicles. Once blended, you can proceed to add the freshly squeezed lime juice, honey or agave syrup, and a pinch of salt. Blend the mixture again to ensure all ingredients are well incorporated, and take a moment to taste the mixture. This is the perfect opportunity to adjust the sweetness according to your preference—simply add more honey or agave syrup if you desire a sweeter treat.
Pouring into Molds
With your mixture prepared and well balanced, it’s time to pour it into popsicle molds. Select molds that suit your preferences; there are various shapes and sizes available, from traditional popsicle sticks to fun, creative designs. When filling the molds, leave a little space at the top to allow for expansion as the mixture freezes. This step is crucial to avoid overflow and ensure that your popsicles come out perfectly.
Once the molds are filled, insert the popsicle sticks and place them in the freezer. The freezing time will depend on the size of your molds, but generally, allowing them to freeze for at least 4-6 hours will yield the best results.
By following these initial steps, you’ll be well on your way to creating a batch of Refreshing Watermelon Lime Bliss Pops that are not only delicious but also a healthy option for cooling off during those hot summer days. Stay tuned for the next part of this guide, where we will explore additional tips, variations, and serving suggestions to enhance your popsicle-making experience.
{{image_2}}
Inserting Sticks
Once your watermelon lime mixture is blended to perfection, it’s time to insert the sticks into your popsicle molds. This step is crucial because the sticks will serve as the handles for your pops. There are a few effective methods to secure the sticks in place:
Various Methods for Securing Sticks in Molds
1. Pre-Freeze Technique: Pour your watermelon-lime mixture into the molds, filling them about three-quarters full. Place the molds in the freezer for about 30-45 minutes, or until the mixture begins to set but is not completely frozen. This will create a slight slush that can hold the sticks in place. Once partially frozen, carefully insert the sticks into the molds, ensuring they stand upright. Return the molds to the freezer to finish freezing.
2. Foil Method: For molds that don’t have a built-in stick holder, you can use aluminum foil. After pouring your mixture into the molds, cover the top with a piece of foil and poke the sticks through the foil. This will keep the sticks upright while the pops freeze.
3. Stick Holder Molds: Some molds come with a built-in stick holder that keeps the pops in place while freezing. These molds are particularly user-friendly and eliminate the need for additional methods.
Discussing Different Types of Popsicle Molds Available
When it comes to popsicle molds, there are several types to choose from, each offering unique features:
– Silicone Molds: Flexible and easy to use, silicone molds allow for easy removal of pops once they are frozen. They come in various shapes and sizes, making them a fun option for kids.
– Plastic Molds: These are the classic popsicle molds that most people are familiar with. They are sturdy and often come with built-in sticks. While they can be a bit more challenging to remove pops from, they are durable and can withstand multiple uses.
– Stainless Steel Molds: Ideal for those looking for a more eco-friendly option, stainless steel molds are reusable and do not retain odors or flavors. They provide a sleek look and can cool down quickly, making the freezing process more efficient.
– Ice Cube Tray Molds: For those who don’t have traditional popsicle molds, ice cube trays can be a creative alternative. Simply pour the mixture into the trays, insert toothpicks or small sticks, and freeze.
Freezing Process
The freezing process is essential for achieving the perfect popsicle texture. Generally, your Watermelon Lime Bliss Pops will need at least 4-6 hours to freeze completely, but several factors can affect this time.
Explanation of Freezing Times and Factors Affecting Them
1. Temperature of Freezer: The colder your freezer, the faster your pops will freeze. Make sure your freezer is set to 0°F (-18°C) for optimal freezing.
2. Mold Material: Different materials retain cold differently. Metal molds tend to freeze faster than plastic molds due to their conductivity.
3. Mixture Consistency: A mixture with higher water content, like watermelon, may freeze more quickly than denser mixtures. If your mixture contains a lot of sugar, it may take longer to freeze.
Tips for Ensuring Even Freezing
– Avoid Overcrowding: While it may be tempting to fill your freezer with multiple molds, overcrowding can impede airflow and lead to uneven freezing. Ensure there is enough space for air to circulate around each mold.
– Check for Ice Crystals: After a few hours, check the pops for ice crystals. If you notice crystals forming on the surface, it may indicate that the pops are freezing too slowly. Consider lowering the temperature setting of your freezer.
Releasing the Pops
Once your Watermelon Lime Bliss Pops have frozen solid, the next step is to release them from their molds. This can sometimes be tricky, so here are some best practices:
Best Methods for Removing Pops from Molds
1. Warm Water Method: Fill a bowl with warm water and quickly dip the bottom half of the mold into the water for about 10-15 seconds. The heat will help loosen the pops from the mold. Make sure not to get any water into the molds.
2. Gentle Pulling: If using silicone molds, you can gently push the sides of the mold to help release the pops. Twist the mold slightly while pulling to create space between the pop and the mold.
3. Room Temperature: Let the pops sit at room temperature for a minute or two before attempting to remove them. This can help soften the mold slightly, making it easier to pull the pops out.
Importance of Gentle Handling to Prevent Breakage
Popsicles can be delicate, especially if they have a high water content. It’s important to handle them gently to avoid breakage. If a pop refuses to budge, don’t force it; instead, return it to the warm water for a few more seconds.
Garnishing and Serving
Now that your Watermelon Lime Bliss Pops are ready to enjoy, consider how to present them to enhance the overall experience.
Ideas for Presentation and Serving Suggestions
– Serve on a Platter: Arrange the pops on a decorative platter, perhaps with some fresh mint leaves or lime wedges for an eye-catching display.
– Add a Drizzle: For an extra touch, drizzle the pops with a simple syrup made from lime juice and sugar, or even a chocolate sauce, for those who enjoy a sweet twist.
– Creative Sticks: Use colorful or patterned sticks to make your pops visually appealing. This is especially fun for children.
Enhancing Flavor with Garnishes
For an added flavor boost, consider garnishing your pops with:
– Chopped Fresh Herbs: Basil or mint can add a refreshing twist that complements the watermelon and lime.
– Coconut Flakes: Sprinkle some unsweetened coconut flakes on top to give a tropical flair.
– Zest: A bit of lime zest can enhance the citrus flavor and add a beautiful visual element.
Nutritional Information and Serving Suggestions
Understanding the nutritional profile of your Watermelon Lime Bliss Pops can help you enjoy them guilt-free.
Breakdown of Calories, Sugars, and Other Nutrients per Popsicle
Each Watermelon Lime Bliss Pop, depending on the size of the mold, generally contains:
– Calories: Approximately 50-70 calories
– Sugars: 10-15 grams (naturally occurring from fruit)
– Fat: 0 grams
– Protein: 0 grams
– Fiber: 1 gram
These pops are low in calories and sugars compared to store-bought varieties that often contain added sugars and preservatives, making them a healthier alternative.
Suggestions for Pairing with Other Summer Dishes or Beverages
These pops make a refreshing addition to any summer gathering. Pair them with:
– Light Salads: A watermelon and feta salad complements the flavors beautifully.
– Grilled Meats: The pops serve as a refreshing palate cleanser alongside grilled chicken or fish.
– Cocktails: They can also be a delightful addition to summer cocktails, adding a fruity flair to a glass of sparkling water or a summer spritzer.
Discussion on Portion Sizes and Healthy Snacking
As a healthy snack, these pops can be enjoyed by both children and adults. They are perfect for portion control, offering a refreshing treat without overindulging. Aim for one pop as a serving, especially since they are naturally sweetened with fruit, making them a satisfying way to curb sweet cravings.
Alternatives and Variations
One of the best aspects of the Watermelon Lime Bliss Pops recipe is its versatility. Here are some creative alternatives and variations to consider:
Exploring Flavor Variations
1. Adding Other Fruits: Experiment with different fruits like strawberries, raspberries, or pineapple for a mixed fruit pop. Simply blend the fruits with the watermelon for a unique flavor combination.
2. Experimenting with Herbs: Adding herbs such as basil or cilantro can elevate the flavor profile. Blend fresh herbs into the mixture for a refreshing herbal note.
3. Vegan and Sugar-Free Adaptations: This recipe is naturally vegan since it only contains fruit. For a sugar-free version, consider using a sugar substitute or enjoy the natural sweetness of the watermelon.
4. Ideas for Adult Versions: For an adult twist, consider adding a splash of rum or vodka to the mixture before freezing. This can turn your refreshing pops into a fun summer cocktail treat.
Conclusion
In summary, Watermelon Lime Bliss Pops are not only a delicious and refreshing treat perfect for the warmer months, but they also offer a healthy snacking option that can be customized to suit your taste. With their vibrant flavors and easy preparation, these pops are a delightful way to enjoy the bounty of summer fruits. Whether you choose to stick with the classic watermelon-lime flavor or experiment with new variations, these pops are sure to become a staple in your summer recipe collection. So grab your molds and start blending, and enjoy these guilt-free treats as part of a balanced diet this summer!