Introduction to Crispy Garlic Parmesan Crusted Chicken
In the world of comfort food, few dishes can rival the allure of crispy fried chicken. This Crispy Garlic Parmesan Crusted Chicken recipe not only pays homage to the classic fried chicken but also elevates it with a savory garlic and Parmesan crust that delivers a satisfying crunch in every bite. Whether you’re preparing a quick weeknight dinner or impressing guests at a special occasion, this dish stands out for its ease of preparation and the delightful flavors that dance on your palate.
The origins of fried chicken can be traced back centuries, with influences from various cultures combining to create what we know today. The addition of garlic and Parmesan in this recipe offers a contemporary twist, showcasing how traditional ingredients can be adapted to suit modern tastes. Imagine sitting down to a plate of golden-brown chicken, its surface glistening with a rich, crunchy coating that promises a burst of flavor. This Crispy Garlic Parmesan Crusted Chicken does not just satisfy hunger; it brings comfort and joy to the dining experience.
As we delve into this recipe, we will guide you through each step, ensuring you achieve that perfect crispy exterior while maintaining the juiciness of the chicken inside. With ingredients that are likely already in your pantry, you can easily whip up this dish and savor the delightful combination of garlic and Parmesan.
Understanding the Ingredients
The Main Components
1. Chicken Breasts: The foundation of this dish, boneless and skinless chicken breasts provide a lean protein source that is not only versatile but also quick to cook. This cut of meat ensures that your dish remains healthy while still offering a satisfying bite.
2. Breading Essentials: The crispy coating is the hallmark of this recipe. A mixture of all-purpose flour, eggs, and seasoned breadcrumbs creates the perfect textural contrast to the tender chicken inside. The flour acts as a base, ensuring that the egg adheres properly to the chicken, while the breadcrumbs provide that coveted crunch.
3. Flavor Enhancers: Garlic and Parmesan are the stars of this dish. Fresh garlic infuses the chicken with a robust flavor, while freshly grated Parmesan cheese adds a nutty richness that complements the savory notes. Italian herbs, such as oregano and basil, round out the flavor profile, offering a hint of earthiness that elevates the dish further.
Health and Nutritional Considerations
When it comes to nutrition, chicken breasts are a powerhouse of lean protein, making them an excellent choice for those looking to maintain a healthy diet. Protein is essential for muscle repair and overall health, and incorporating chicken into your meals can help meet daily protein requirements.
Moreover, by choosing high-quality ingredients, you not only enhance the flavor of your dish but also its nutritional value. Fresh garlic is known for its numerous health benefits, including its potential to boost the immune system and reduce inflammation. Similarly, using fresh Parmesan cheese instead of processed varieties ensures that you are consuming a product rich in calcium and essential nutrients.
Step-by-Step Instructions for Perfect Chicken
Preparing the Chicken
To begin your culinary adventure, the first step is to prepare the chicken. This involves pounding the chicken breasts to ensure they cook evenly. Begin by placing a chicken breast between two pieces of plastic wrap or parchment paper. Using a meat mallet or rolling pin, gently pound the chicken until it reaches a consistent thickness of about half an inch. This technique not only promotes even cooking but also tenderizes the meat, allowing it to absorb the flavors of the coating better.
Once you have pounded the chicken, it’s essential to season it adequately. A simple sprinkle of salt and pepper on both sides will enhance the natural flavors and prepare it for the delicious crust that is to follow.
Setting Up Your Breading Station
Now that your chicken is prepped, it’s time to create an efficient breading station. Setting up your dredging setup properly can streamline the coating process and minimize mess in your kitchen.
1. Flour Station: In a shallow dish, add all-purpose flour and season it with a pinch of salt, pepper, and any additional spices you prefer. This will be your first layer of flavor.
2. Egg Wash: In another shallow bowl, crack a couple of eggs and whisk them until they are well combined. For an extra touch, you can add a splash of milk to make the egg wash a bit creamier, which helps the breadcrumb coating stick better.
3. Breadcrumb Mixture: In a third dish, combine seasoned breadcrumbs with grated Parmesan cheese and finely minced garlic. This mixture will create the crunchy top layer that is both flavorful and satisfying.
With your stations set up, you are now ready to coat the chicken. Begin by dredging each piece in the flour, ensuring it is completely covered, then dip it into the egg wash, allowing any excess to drip off. Finally, coat the chicken in the breadcrumb mixture, pressing gently to ensure the crumbs adhere well to the surface. This multi-layered approach creates an irresistible crust that will be the highlight of your dish.
As you prepare to cook the chicken, make sure to preheat your oven or skillet, depending on your cooking method of choice. This ensures that the crust will set beautifully, resulting in the perfect balance of crunch and flavor.
{{image_2}}
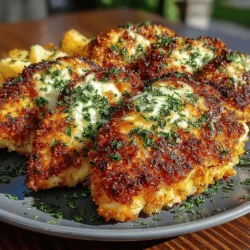
Coating the Chicken
The first step to achieving the perfect Crispy Garlic Parmesan Crusted Chicken is ensuring that the chicken is coated evenly and generously. The right coating technique is essential for that crunchy, flavorful crust that elevates this dish to the next level.
Techniques for Even Coating
1. Dredging: Start by setting up a dredging station with three separate shallow bowls or plates. In the first bowl, place the all-purpose flour seasoned with salt and pepper. In the second bowl, whisk together eggs and a splash of milk or water to create an egg wash. The third bowl should contain a mixture of breadcrumbs, grated Parmesan cheese, minced garlic, and your choice of herbs (like Italian seasoning or parsley).
2. Dipping: Begin with the chicken breasts, patting them dry with paper towels to remove excess moisture. This helps the coating adhere better. First, dredge the chicken in the flour, shaking off any excess. Next, dip it into the egg wash, ensuring it is fully coated. Finally, press the chicken into the breadcrumb mixture, making sure to cover all sides thoroughly. For an extra thick crust, repeat the egg wash and breadcrumb steps again before placing the chicken on a wire rack to set for about 10-15 minutes. This allows the coating to stick better during cooking.
3. Pressing: When coating the chicken, press down firmly on the breadcrumbs to ensure they adhere well. This technique not only helps create a thicker crust but also ensures that every bite is packed with flavor.
Cooking Techniques for Optimal Results
Once your chicken is beautifully coated, it’s time to move on to the cooking techniques that will yield the best results.
Frying the Chicken
Frying is a classic method that gives the chicken its signature crispy texture. However, choosing the right oil and technique can make all the difference.
Choosing the Right Oil
When it comes to frying, not all oils are created equal. For deep frying, choose oils with a high smoke point, such as canola oil, peanut oil, or vegetable oil. These oils can withstand the high temperatures needed for frying without burning or smoking.
To determine if the oil is ready for frying, use a kitchen thermometer to check the temperature, which should be around 350°F to 375°F. If you don’t have a thermometer, you can test the oil by dropping a small piece of bread into it. If it sizzles and browns within a minute, the oil is ready.
Frying in Batches
To achieve a perfectly crisp exterior, it’s crucial not to overcrowd the pan. Fry the chicken in batches, giving each piece enough space to cook evenly. Depending on the size of your skillet or pot, you can typically fry 2-4 pieces at a time. Fry each piece for about 4-5 minutes per side or until the chicken reaches a golden brown color and an internal temperature of 165°F. Use a slotted spoon to remove the chicken and place it on a plate lined with paper towels to absorb any excess oil.
Baking to Finish
While frying provides that amazing crunch, finishing the chicken in the oven is a necessary step for ensuring that it cooks through and remains juicy.
The Importance of Baking
After frying, transfer the chicken to a preheated oven at 375°F. This step not only helps to ensure the meat cooks completely but also allows the coating to become even crispier. Bake for an additional 10-15 minutes, or until the internal temperature reads 165°F. This method is particularly important for thicker cuts of chicken, as it guarantees the meat stays tender and juicy while achieving that perfect golden crust.
Presentation and Serving Suggestions
Now that your Crispy Garlic Parmesan Crusted Chicken is ready, it’s time to make it visually appealing and think about what to pair it with for a complete meal.
Plating Your Dish
Creating an inviting presentation can enhance the dining experience. Here are some tips for plating your chicken:
1. Garnishing: Fresh herbs, such as parsley or basil, can add a pop of color when sprinkled on top of the chicken. You can also add lemon wedges or slices for a zesty touch that complements the garlic flavors.
2. Layering: Place the chicken on a bed of sautéed spinach or a creamy garlic sauce to add depth to the presentation. Consider using a large, white plate to make the colors of your dish stand out.
3. Accompaniments: Arrange your chosen sides artfully around the chicken. For example, if you’ve prepared a side of roasted vegetables or creamy mashed potatoes, place them alongside the chicken to create a well-rounded plate.
Pairing Suggestions
To complement the Crispy Garlic Parmesan Crusted Chicken, consider serving it with sides that balance its rich flavors:
– Salads: A fresh green salad with a light vinaigrette can provide a refreshing contrast to the crispy chicken. Try mixing arugula, cherry tomatoes, and cucumbers for a vibrant salad.
– Vegetables: Roasted or grilled vegetables, such as asparagus, zucchini, or Brussels sprouts, add both color and nutrition to the meal. The slight char from grilling or roasting pairs well with the garlic Parmesan crust.
– Starches: Classic sides such as garlic mashed potatoes, creamy risotto, or pasta tossed in olive oil and herbs can round out the meal. For a lighter option, serve with quinoa or a grain salad.
Conclusion: Enjoying Your Delicious Creation
Crispy Garlic Parmesan Crusted Chicken is not just another chicken dish; it is a delightful combination of flavors and textures that can elevate any meal. The crunchy, golden crust paired with the juicy interior creates a satisfying experience that will please both family and friends alike.
Whether you serve this dish for a casual weeknight dinner or as a centerpiece for a special occasion, it is sure to impress. The preparation may seem detailed, but the steps are straightforward, allowing you to enjoy the cooking process as much as the final product.
Embrace the joy of cooking with this recipe, and savor the delightful flavors that Crispy Garlic Parmesan Crusted Chicken brings to your table. Don’t forget to experiment with different side dishes and garnishes to personalize your meal. Happy cooking!