
Rustic Blueberry Bliss Galette: A Delightful Dessert Recipe
When it comes to desserts that marry simplicity with elegance, the rustic galette stands out as a beloved favorite. This free-form pastry, often referred to as a “galette,” captures the essence of homemade goodness without the fuss of a traditional pie or tart. The allure of a galette lies in its versatility; it can be filled with a variety of fruits, making it a perfect choice for any season. In this article, we will delve into the delightful world of the Rustic Blueberry Bliss Galette, showcasing the joys of using fresh blueberries and the straightforward steps that make this dessert accessible to bakers of all levels.
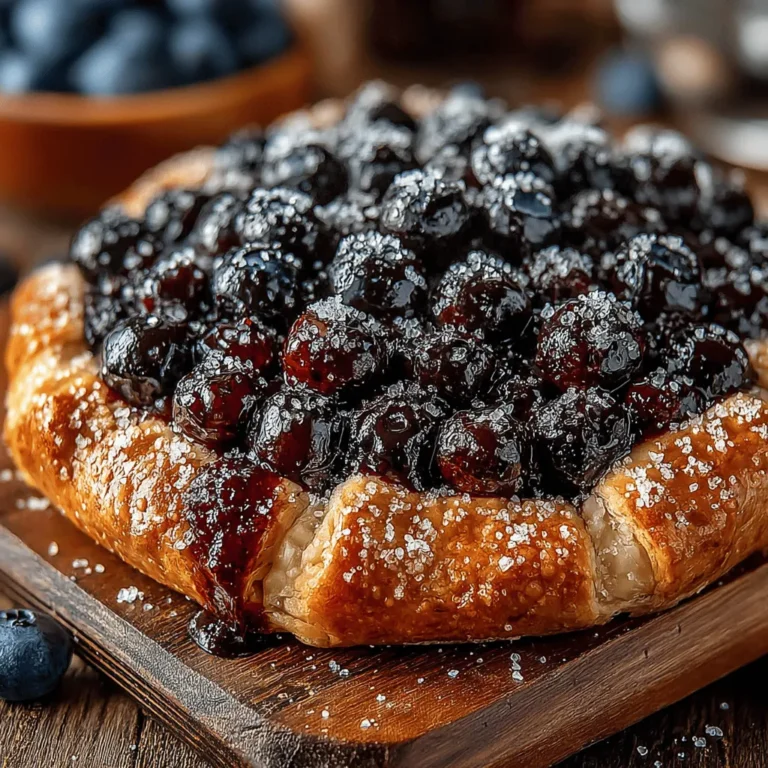
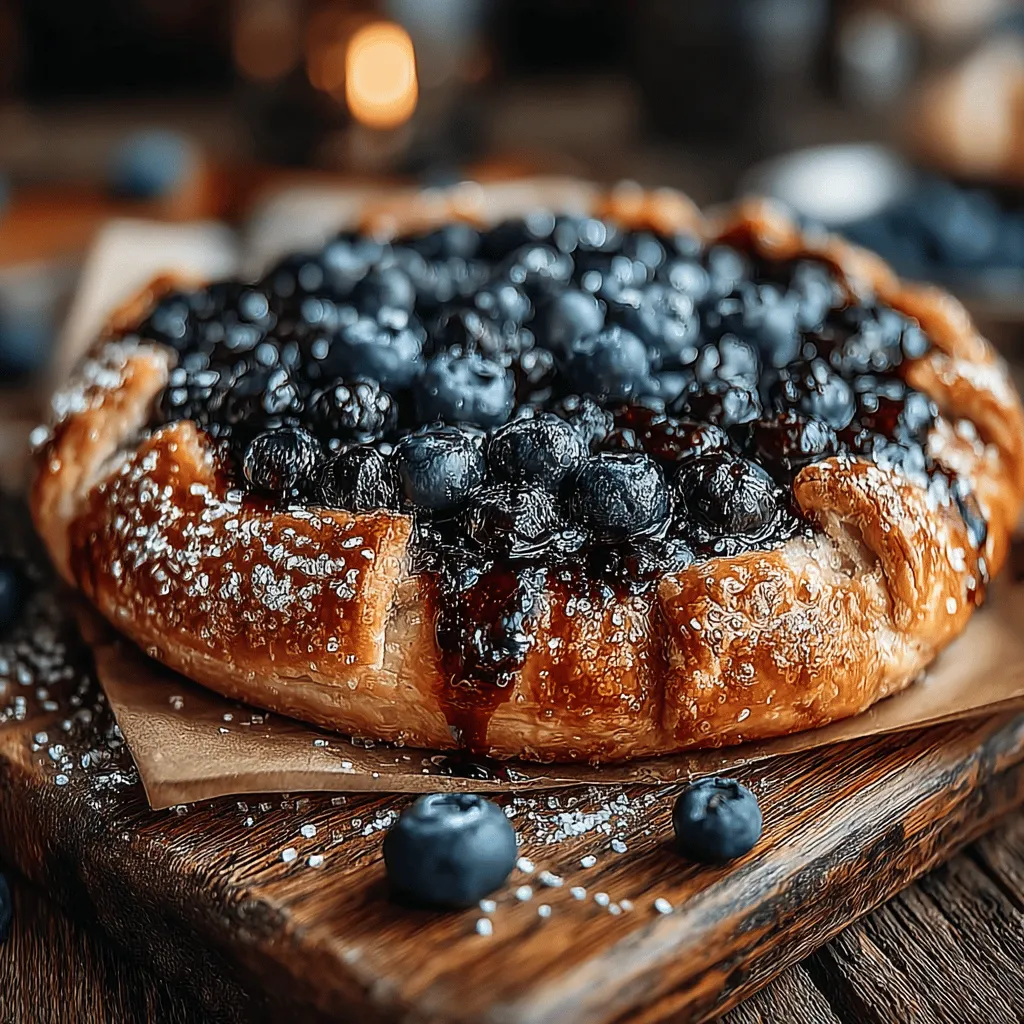
The Rustic Blueberry Bliss Galette is not just a treat for the taste buds; it’s also a feast for the eyes. The striking contrast of deep blue berries against a golden-brown crust creates an inviting centerpiece for any occasion. Whether you’re hosting a family gathering, packing a picnic, or looking to impress guests at a special dinner, this galette is sure to be a hit. Its casual presentation allows it to shine in both formal and relaxed settings, making it a go-to dessert for any event.
Understanding the Galette: What Makes It Special?
To fully appreciate the Rustic Blueberry Bliss Galette, it’s essential to understand what a galette is and the rich history behind this French pastry. A galette is essentially a flat, round pastry that can be filled with a variety of ingredients, from fruits to savory fillings. Its origins can be traced back to the rustic kitchens of France, where it was often made with leftover dough and seasonal produce. This approachable dish exemplifies the French philosophy of cooking—using quality ingredients to create flavorful meals without unnecessary embellishments.
What sets galettes apart from traditional pies and tarts is their delightful imperfection. Unlike the perfectly crimped edges of a pie, a galette is intentionally free-form, allowing for a more relaxed and homey feel. This rustic charm is further enhanced by the flaky, buttery crust that encases the sweet filling. With no need for a pie dish, galettes can be shaped and baked on a simple baking sheet, making them an ideal choice for beginner bakers or those looking to simplify the baking process.
One of the best aspects of making a galette is its inherent versatility. The recipe can be easily adapted to showcase seasonal fruits, making it a wonderful way to enjoy the bounty of nature. From peaches in the summer to apples in the fall, the galette can be filled with whatever is fresh and available. In this case, we will focus on the star of our dish—juicy, vibrant blueberries. Not only do these berries add a burst of flavor, but they also provide a wealth of health benefits, making this dessert a guilt-free indulgence.
Ingredients Breakdown: What You Need for the Perfect Galette
Creating the perfect Rustic Blueberry Bliss Galette begins with understanding the ingredients that make up both the crust and the filling. Let’s break down what you’ll need to craft this delightful dessert.
Crust Ingredients:
1. All-Purpose Flour: The foundation of your galette is the crust, and using quality all-purpose flour is crucial for achieving the right texture. The flour provides structure and helps create a tender, flaky pastry.
2. Chilled Unsalted Butter: The role of butter in the crust cannot be overstated. Using chilled, unsalted butter ensures that the pastry remains flaky and rich. The cold fat, when incorporated into the flour, creates pockets of steam during baking, resulting in a beautifully layered crust.
3. Sugar and Salt: A small amount of sugar enhances the flavor of the crust, while salt balances the sweetness and brings out the richness of the butter. These two ingredients are essential for a well-rounded flavor profile.
4. Ice Water: The addition of ice water is critical for forming the dough. It helps bring the ingredients together without warming the butter too much, ensuring the flakiness of the pastry is preserved.
Filling Ingredients:
1. Fresh vs. Frozen Blueberries: While fresh blueberries are ideal for this recipe, frozen blueberries can be a suitable alternative when fresh ones are out of season. If using frozen berries, be sure to thaw and drain them to avoid excess moisture in the filling.
2. Sweetening Options: The sweetness of your blueberries will dictate how much sugar you’ll need to add. Taste the berries before deciding on the amount, as the natural sweetness can vary. You can also experiment with alternative sweeteners, such as honey or maple syrup, for a unique flavor twist.
3. Cornstarch: This ingredient is essential for thickening the filling. It helps absorb excess moisture from the blueberries, creating a cohesive and luscious filling that won’t run when you cut into the galette.
4. Flavor Enhancers: To elevate the flavor of the blueberry filling, consider adding a splash of vanilla extract, a squeeze of lemon juice, and a dash of cinnamon. These ingredients complement the blueberries beautifully and add depth to the overall taste of the galette.
Step-by-Step Instructions for Crafting Your Rustic Blueberry Bliss Galette
Now that we’ve covered the essential ingredients for the Rustic Blueberry Bliss Galette, it’s time to dive into the initial steps of crafting this delightful dessert. Follow these straightforward instructions to create a delicious galette that will impress your family and friends.
1. Prepare the Crust: In a large mixing bowl, combine the all-purpose flour, sugar, and salt. Cut the chilled unsalted butter into small cubes and add it to the flour mixture. Using a pastry cutter or your fingertips, work the butter into the flour until the mixture resembles coarse crumbs. Be careful not to overwork the dough; you want to keep some small chunks of butter for flakiness. Gradually add ice water, one tablespoon at a time, mixing until the dough just comes together. Form the dough into a disk, wrap it in plastic wrap, and refrigerate for at least 30 minutes.
2. Make the Filling: While the dough chills, prepare the blueberry filling. In a medium bowl, combine the fresh or thawed blueberries, sugar, cornstarch, vanilla extract, lemon juice, and cinnamon. Gently toss the ingredients together until the blueberries are evenly coated. Allow the mixture to sit for about 10 minutes, letting the flavors meld and the cornstarch begin to work its magic.
3. Roll Out the Dough: Once the dough has chilled, remove it from the refrigerator and place it on a lightly floured surface. Using a rolling pin, roll the dough into a circle about 12 inches in diameter. Don’t worry if the edges are uneven; the rustic nature of a galette embraces its imperfections. Transfer the rolled-out dough to a parchment-lined baking sheet.
4. Assemble the Galette: Spoon the blueberry filling into the center of the rolled-out dough, leaving a 2-3 inch border around the edges. Gently fold the edges of the dough over the filling, creating pleats as you go. The center will remain open to showcase the blueberries. Brush the exposed dough with a bit of melted butter and sprinkle with sugar for added sweetness and a beautiful golden finish.
By following these initial steps, you’ll be well on your way to creating a Rustic Blueberry Bliss Galette that is not only delicious but also visually stunning. Stay tuned for the next part, where we will cover the baking process and tips for serving this delightful dessert.
Making the Crust
Creating the perfect crust is essential for any galette, and this rustic blueberry bliss galette is no exception. Start by gathering the following ingredients for the crust:
– 1 ½ cups all-purpose flour
– 1 tablespoon granulated sugar
– ½ teaspoon salt
– ½ cup unsalted butter, chilled and diced
– 4 to 5 tablespoons ice water
Instructions for the Dough
1. Mix the Dry Ingredients: In a large mixing bowl, combine the all-purpose flour, granulated sugar, and salt. Whisk them together until evenly distributed.
2. Cut in the Butter: Add the chilled, diced butter to the dry mixture. Using a pastry cutter or your fingertips, quickly cut the butter into the flour until the mixture resembles coarse crumbs. You should still see small bits of butter, which will create a flaky texture when baked.
3. Add Ice Water: Gradually add the ice water, one tablespoon at a time, mixing gently with a fork after each addition. Stop adding water as soon as the dough begins to come together. You want a moist but not sticky dough, so be careful not to overwork it.
4. Chill the Dough: Shape the dough into a disk, wrap it in plastic wrap, and refrigerate for at least 30 minutes. Chilling allows the gluten to relax, resulting in a tender crust.
Tips for Achieving the Perfect Dough Consistency
– Use cold ingredients: Keep your butter and water ice-cold to ensure a flaky texture.
– Avoid over-mixing: Handle the dough as little as possible to prevent toughening.
– Test for texture: The dough should be slightly tacky to the touch but not sticky.
Preparing the Filling
While the dough is chilling, it’s time to prepare the blueberry filling. The filling not only adds flavor but also requires some preparation to enhance its taste and texture.
Ingredients for the Filling
– 2 cups fresh blueberries (or frozen, if out of season)
– 3 tablespoons granulated sugar
– 1 tablespoon cornstarch
– 1 tablespoon lemon juice
– 1 teaspoon vanilla extract
– ½ teaspoon cinnamon (optional)
Instructions for the Filling
1. Combine Ingredients: In a medium bowl, gently toss the blueberries with sugar, cornstarch, lemon juice, vanilla extract, and cinnamon until well combined.
2. Let it Rest: Allow the mixture to sit for about 15-20 minutes. This resting period helps the flavors meld and allows the cornstarch to absorb some of the blueberry juices, preventing a soggy crust.
Rolling Out the Dough
Once your dough has chilled, it’s time to roll it out. This step is crucial for achieving the right thickness and ensuring an easy transfer to the baking sheet.
Techniques for Rolling
1. Prepare Your Surface: Lightly flour your work surface and rolling pin to prevent sticking.
2. Roll to the Right Thickness: Place the chilled dough on the floured surface and begin rolling from the center outward, turning the dough a quarter turn after each roll to maintain an even shape. Aim for a thickness of about 1/8 inch.
3. Transfer Without Tearing: Once rolled out, carefully lift the dough using a spatula or your hands and transfer it to a parchment-lined baking sheet. If the dough tears, simply press it back together; the rustic charm of a galette is all about imperfections.
Assembling the Galette
The assembly of the galette is what brings your creation to life. Embrace the rustic style by allowing some of the filling to peek out.
Steps to Assemble
1. Add the Filling: Spoon the blueberry mixture into the center of the rolled-out dough, leaving about a 2-inch border around the edges.
2. Create Pleats: Fold the edges of the dough over the filling, pleating as you go. This doesn’t need to be perfect; the rustic look is part of the galette’s appeal. Pinch the pleats to secure them.
3. Egg Wash and Sugar Topping: To give your galette a beautiful golden color after baking, whisk one egg with a tablespoon of water and brush it over the crust. Sprinkle coarse sugar over the edges for added texture and sweetness.
Baking the Galette: Achieving the Perfect Finish
Baking your galette to perfection is the key to a delicious dessert.
Optimal Baking Temperature and Time
Preheat your oven to 400°F (200°C). Bake the galette for 30-35 minutes, or until the crust is golden brown and the blueberry filling is bubbling.
Signs That the Galette is Ready
– The crust should be a beautiful golden brown.
– You should see the blueberry juices bubbling around the edges of the filling.
Cooling Tips
Once baked, remove the galette from the oven and let it cool on a wire rack for at least 15 minutes. This will help the filling set and make slicing easier.
Presentation Ideas: Elevating Your Dessert
Presentation can elevate your rustic blueberry bliss galette from simple to stunning.
Serving Suggestions
– On a Wooden Board: Serve the galette on a rustic wooden board for a charming display.
– Garnished with Mint: Add fresh mint leaves for a pop of color and an aromatic touch.
Pairing Ideas
– Vanilla Ice Cream: The creaminess of vanilla ice cream pairs beautifully with the tartness of blueberries.
– Whipped Cream: A dollop of freshly whipped cream adds a light and airy contrast.
Tips on Photographing the Galette
– Utilize natural light for the best photos.
– Capture the galette from various angles, showcasing the flaky crust and juicy filling.
– Include props like fresh blueberries or mint leaves for added visual interest.
Nutritional Insights: A Closer Look at the Ingredients
Understanding the nutritional benefits of your ingredients can help you enjoy your galette guilt-free.
Key Nutrients in Blueberries
Blueberries are packed with antioxidants, vitamins C and K, and dietary fiber. They are known for their anti-inflammatory properties and can contribute to heart health.
Balance Between Indulgence and Nutrition
While this galette is a delightful treat, you can still enjoy it while being mindful of your health. The fiber from the blueberries and the potential for whole grain flour can make this dessert a bit more nutritious.
Healthier Alternatives
– Whole Wheat Flour: Swap out some or all of the all-purpose flour for whole wheat flour for added fiber and nutrients.
– Reduce Sugar: Adjust the sugar in the filling to suit your taste or use natural sweeteners like honey or maple syrup.
Conclusion
The Rustic Blueberry Bliss Galette is not just a dessert; it’s an experience that brings warmth and joy to any gathering. Its simplicity and versatility allow for endless variations, encouraging bakers to experiment with different fruits and flavors. Whether you choose to stick with the classic blueberry or venture into the realm of peaches, cherries, or mixed berries, this galette is sure to impress.
Baking is an art that fosters creativity and connection, so gather your loved ones and share the joy of this delightful dessert. The Rustic Blueberry Bliss Galette is perfect for any occasion, and with each bite, you’ll savor the love and effort that went into making it. Enjoy the process, and happy baking!
