Crispy No-Bake Cereal S’mores Bars: A Deliciously Easy Treat
Introduction
In the world of desserts, no-bake recipes have carved out a special niche, primarily due to their convenience and the delightful simplicity they offer. These treats allow home bakers to whip up delicious confections without the need for an oven, making them ideal for warm weather or busy schedules. Among these easy-to-make delights, the Crispy No-Bake Cereal S’mores Bars stand out as a perfect blend of flavors and textures, encapsulating the campfire essence of traditional s’mores while providing a quick and hassle-free preparation method.
Crispy No-Bake Cereal S’mores Bars are not only a nostalgic nod to classic summer treats; they also offer a versatile canvas for customization. Whether you are looking for gluten-free options, want to cater to vegan diets, or simply want to experiment with different flavor profiles, this recipe can adapt to your needs. With just a handful of simple ingredients, you can create a delightful dessert that pleases both kids and adults alike.
Understanding the Ingredients
Before diving into the preparation, it’s important to understand the role each ingredient plays in creating the perfect Crispy No-Bake Cereal S’mores Bars.
Puffed Rice Cereal: The foundation of these bars is puffed rice cereal, which contributes a light and crispy texture. This ingredient is a popular choice in many no-bake recipes, as it adds volume without weighing down the mixture. Its neutral flavor allows the sweetness of the other components to shine through, making it an ideal base for the bars.
Graham Cracker Crumbs: To achieve that unmistakable s’mores flavor, graham cracker crumbs are essential. They provide a sweet, crunchy element that mimics the traditional graham cracker used in s’mores. For those with gluten sensitivities, crushed gluten-free graham crackers or even almond flour can be used as substitutes, allowing everyone to enjoy these delicious bars.
Mini Marshmallows: Another hallmark of s’mores, mini marshmallows lend a gooey sweetness to the bars. Their small size allows for even distribution throughout the mixture, ensuring that every bite is perfectly sweet. For those who prefer alternative options, vegan marshmallows are available and can easily be used in place of traditional mini marshmallows.
Semi-Sweet Chocolate Chips: Chocolate is the heart of any s’mores recipe, and semi-sweet chocolate chips add a rich, creamy layer that complements the other ingredients beautifully. They melt down easily, creating a luscious mixture that binds the bars together. If you’re looking for a dairy-free option, there are various brands of vegan chocolate chips that work just as well.
Nut Butters (Peanut Butter or Almond Butter): Nut butters not only enhance the flavor profile of the bars but also add a creamy texture that helps to hold everything together. Peanut butter offers a rich, nutty taste, while almond butter provides a slightly sweeter, milder flavor. Both options contribute healthy fats and protein, making these bars a more satisfying treat.
Natural Sweeteners (Honey or Maple Syrup): To sweeten the mixture, natural sweeteners like honey or maple syrup are commonly used. Honey adds a floral sweetness, while maple syrup brings a unique depth of flavor. For those adhering to a vegan diet, maple syrup is the ideal choice, as it provides sweetness without any animal products.
Vanilla Extract and Salt: Finally, a splash of vanilla extract elevates the overall flavor of the bars, adding warmth and depth. A pinch of salt enhances the sweetness, creating a well-balanced dessert that is neither too sweet nor too bland.
Step-by-Step Instructions for Preparation
Now that we have a clear understanding of the ingredients, let’s move on to the preparation process, ensuring that every step is executed flawlessly for the best results.
Preparing the Baking Dish: Start by preparing your baking dish. A 9×9-inch square dish is ideal for this recipe, but you can use a larger or smaller dish depending on how thick you want the bars to be. Line the dish with parchment paper, allowing some overhang on the sides. This will make it easy to lift the bars out once they are set. Lightly grease the parchment paper with cooking spray to further prevent sticking.
Combining Dry Ingredients: In a large mixing bowl, combine the puffed rice cereal and graham cracker crumbs. It’s important to ensure that these dry ingredients are evenly distributed to achieve a consistent texture and flavor throughout the bars. Use a whisk or spatula to gently mix them together, breaking up any clumps of graham cracker crumbs.
Melting the Wet Ingredients: In a medium saucepan over low heat, combine the semi-sweet chocolate chips and your choice of nut butter. Stir continuously to prevent burning and to achieve a smooth, melted consistency. If you prefer, you can also melt these ingredients in the microwave in short bursts, stirring in between until fully melted. Once melted, remove from heat and add in the natural sweetener (honey or maple syrup) and a splash of vanilla extract. Mix well to combine all the wet ingredients into a creamy mixture.
Mixing Everything Together: Pour the melted wet ingredients over the dry mixture. Using a spatula, gently fold the ingredients together until the cereal and graham cracker crumbs are thoroughly coated. Be careful not to over-mix, as this can lead to clumping. As you mix, add in the mini marshmallows, folding them in until they are evenly distributed throughout the mixture. The heat from the melted chocolate and nut butter will slightly soften the marshmallows, making them even more gooey and delicious.
With these initial steps completed, you are well on your way to creating a batch of Crispy No-Bake Cereal S’mores Bars that are sure to impress. Stay tuned for the next section, where we will guide you through the final steps of pressing the mixture into the dish and allowing it to set, ensuring that your bars are perfectly formed and ready to enjoy.
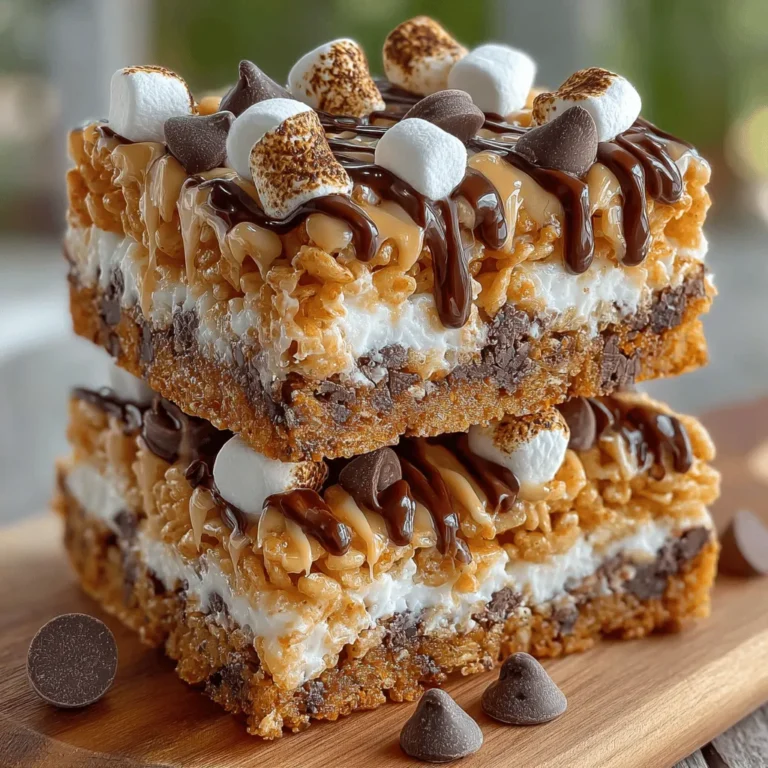
{{image_2}}
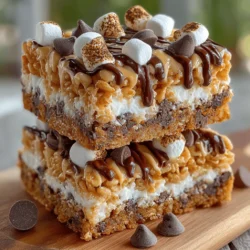
Crispy No-Bake Cereal S’mores Bars are a delightful treat that combines the nostalgic flavors of s’mores with the convenience of a no-bake recipe. With a perfect balance of crunch, sweetness, and a hint of chocolate, these bars are sure to please both kids and adults alike. In this section, we will cover essential steps for packing, chilling, slicing, serving, and storing these delicious bars, as well as nutritional benefits and customization options.
Packing into the Baking Dish
Once you have your cereal mixture ready, it’s time to pack it into your baking dish. This step is crucial for achieving the perfect texture and ensuring that your bars hold their shape when sliced.
1. Choose the Right Dish: An 8×8 or 9×9-inch square baking dish works best for this recipe. You can line the dish with parchment paper, which will make it easier to lift the bars out once they are set.
2. Pressing Techniques: To prevent damaging the texture of your bars, use a flat spatula or the back of a measuring cup to gently press the mixture into the dish. Start at the center and work your way outwards, applying even pressure. Be careful not to compress the mixture too tightly, as this can lead to overly dense bars. Instead, aim for a firm but slightly airy packing to maintain the crispy texture.
3. Even Distribution: Make sure to spread the mixture evenly across the dish. This will help ensure that each bar has the same delicious flavor and texture. If you find any areas that are too loose, simply press them down slightly.
Chilling to Set
Chilling the bars is a critical step that affects their firmness and overall texture.
1. Chilling Time: After packing the mixture, cover the baking dish with plastic wrap or aluminum foil. Place it in the refrigerator for at least 1-2 hours. This chilling time allows the bars to set properly, making them easier to slice and preventing them from falling apart.
2. Why It Matters: If you skip the chilling step or don’t allow enough time, the bars may remain too soft and crumbly. Proper chilling helps the mixture bind together, thanks to the melted marshmallows and nut butter, creating that satisfying chewy texture that pairs so well with the crispy cereal.
Slicing and Serving
Once the bars have chilled and set, it’s time to slice and serve them.
1. Cutting Techniques: To slice the bars into uniform pieces, use a sharp knife. For best results, run the knife under warm water and wipe it dry before cutting. This will help the knife glide through the bars cleanly, ensuring neat edges.
2. Serving Suggestions: These bars can be served as is, or you can enhance their presentation by drizzling melted chocolate or a sprinkle of mini marshmallows on top. They pair perfectly with a glass of cold milk or a warm cup of hot chocolate, making them an excellent treat for any occasion.
Storage and Shelf Life
To keep your Crispy No-Bake Cereal S’mores Bars fresh and delicious, follow these storage tips:
1. Best Practices: Store the bars in an airtight container at room temperature for up to one week. If you prefer, you can also refrigerate them to prolong their freshness. Just be aware that chilling may affect the texture slightly, making them a bit firmer.
2. Shelf Life: When stored properly, these bars can last up to two weeks. To test their freshness, look for any signs of spoilage, such as an off smell or any visible mold. The bars should still have a pleasant, sweet aroma indicative of their ingredients.
Nutritional Benefits of Crispy No-Bake Cereal S’mores Bars
These delightful treats not only satisfy your sweet tooth but also offer nutritional benefits thanks to their wholesome ingredients.
1. Key Ingredients: The primary ingredients—cereal, nut butter, and natural sweeteners—provide a balanced source of carbohydrates, healthy fats, and protein. Whole grain cereals contribute fiber, which aids digestion and provides sustained energy.
2. Balanced Snack: These bars can fit well into a balanced diet when consumed in moderation. They serve as a great snack option for both kids and adults, providing a quick energy boost without excessive refined sugars.
3. Health Benefits: Using natural sweeteners like honey or maple syrup instead of refined sugar can enhance the bars’ nutritional profile. Nut butters add protein and healthy fats, which can help keep you full for longer and support overall health.
Customization and Variations
One of the best aspects of Crispy No-Bake Cereal S’mores Bars is their versatility. Here are some ways to customize your bars to suit your taste preferences:
1. Additional Ingredients: Consider adding dried fruits, such as cranberries or raisins, for a chewy texture. Nuts or seeds can also be incorporated for added crunch and nutrition. Just make sure to chop larger ingredients into smaller pieces for even distribution.
2. Flavor Variations: Play around with different types of chocolate, such as dark chocolate or white chocolate, to create unique flavor profiles. You can also experiment with flavored nut butters, like almond or cashew butter, to give your bars a different twist.
3. Dietary Adaptations: If you or someone you know has dietary restrictions, these bars can be easily adapted. For a gluten-free version, use certified gluten-free cereal. To make them nut-free, simply substitute the nut butter with sun butter or a similar seed-based alternative. Vegan options can be achieved by using maple syrup in place of honey and ensuring that the chocolate is dairy-free.
Conclusion
In summary, Crispy No-Bake Cereal S’mores Bars are not only simple to make but also a delicious treat that can be enjoyed any time of the year. The process of making these bars is straightforward, and the results are undeniably satisfying. Whether you are looking for a fun family activity, a sweet addition to a party, or a quick snack to satisfy your cravings, this recipe ticks all the boxes.
We encourage you to experiment with the recipe, making it your own by trying out different ingredients and flavor combinations. With endless possibilities, these bars are sure to become a staple in your recipe repertoire. Enjoy the delightful crunch and sweetness, and share them with friends and family for a treat that everyone will love!