Introduction
As the summer sun blazes overhead, the desire for cool and refreshing desserts grows stronger. Icebox desserts, with their chilled and creamy textures, have become a beloved choice for warm weather gatherings and family picnics. These no-bake treats are not only easy to prepare but also offer a delightful way to enjoy seasonal fruits. One standout recipe that embodies the essence of summer is the Sweet Summer Peach & Cream Icebox Squares.
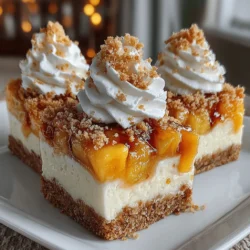
This dessert artfully combines the luscious sweetness of fresh peaches with a smooth and creamy filling, all resting on a buttery graham cracker crust. It’s an ideal treat for everything from backyard barbecues to casual family dinners, providing a burst of flavor and a cooling effect that everyone can enjoy. With minimal effort and no oven required, these icebox squares are a perfect solution for hot days when you want to indulge without overheating in the kitchen.
Understanding the Ingredients
To create the Sweet Summer Peach & Cream Icebox Squares, it’s essential to understand the key ingredients that contribute to its delightful flavor and texture.
1. Fresh Peaches: At the heart of this dessert are the peaches, which should be perfectly ripe. The juiciness and sweetness of fresh peaches elevate this dessert, making it a celebration of summer. When selecting peaches, look for fruits that yield slightly to pressure and have a fragrant aroma. Their natural sweetness balances the creaminess of the filling and adds a vibrant color.
2. Graham Crackers: The base of our icebox squares is a simple graham cracker crust. This component provides a crunchy contrast to the smooth layers above. The subtle sweetness and slightly nutty flavor of the graham crackers enhance the overall taste of the dessert.
3. Cream Cheese: A key player in the cream layer, cream cheese adds richness and a slight tang that complements the sweetness of the peaches. Using softened cream cheese is crucial; it ensures a smooth consistency that blends seamlessly with the other ingredients.
4. Heavy Cream: Whipped heavy cream is responsible for the light and airy texture of the dessert. It adds volume and a cloud-like quality that makes each bite feel indulgent without being overly heavy.
5. Powdered Sugar: To sweeten the cream layer, powdered sugar is used. Its fine texture dissolves easily, creating a smooth filling without any graininess.
6. Vanilla Extract: A splash of vanilla extract amplifies the flavors in the cream layer, adding a warm and inviting note that ties all the ingredients together.
Each of these ingredients plays a vital role in crafting the Sweet Summer Peach & Cream Icebox Squares, ensuring a delightful balance of flavors and textures that is sure to impress.
Crafting the Perfect Crust
The first step in creating your Sweet Summer Peach & Cream Icebox Squares is preparing the graham cracker crust. Follow these simple steps to achieve the perfect base:
1. Gather Your Ingredients: You will need about 1 ½ cups of graham cracker crumbs, ½ cup of unsalted butter, and ¼ cup of granulated sugar.
2. Melt the Butter: In a microwave-safe bowl or a small saucepan, melt the unsalted butter until it is completely liquid. Using unsalted butter is important, as it allows you to control the saltiness of your dessert.
3. Combine the Crust Ingredients: In a mixing bowl, combine the graham cracker crumbs and granulated sugar. Pour the melted butter over the crumb mixture.
4. Mix Until Combined: Using a fork or your fingers, mix the ingredients together until the crumbs are well-coated with butter and the mixture resembles wet sand. This ensures that the crust holds together when pressed into the pan.
5. Press the Mixture into the Pan: Transfer the crumb mixture into a 9×9-inch square baking dish or a similar-sized pan. Using the back of a measuring cup or your fingers, press the mixture firmly into an even layer across the bottom of the pan. The key is to create a solid foundation that will support the creamy layers above.
6. Chill the Crust: Once your crust is pressed into place, place it in the refrigerator for about 15-20 minutes to allow it to set and firm up. This step is crucial as it helps the crust hold its shape when you add the cream layer.
Achieving the right texture for your graham cracker crust is essential. It should be firm enough to hold the layers above but still crumbly enough to provide a pleasant crunch. Avoid over-baking or cooking the crust, as this can lead to a dry texture that detracts from the overall experience.
Creating the Cream Layer
With the crust ready, it’s time to create the luscious cream layer that will sit atop the graham cracker base. Here’s how to make it:
1. Prepare the Cream Cheese: Start by ensuring your cream cheese is softened to room temperature. This will make it easier to blend smoothly without lumps. If you forgot to take it out in advance, you can microwave it in short bursts (about 10 seconds) to soften it up.
2. Beat the Cream Cheese: In a large mixing bowl, use an electric mixer to beat the softened cream cheese until it’s creamy and free of lumps. This should take about 1-2 minutes on medium speed.
3. Add Powdered Sugar and Vanilla: Gradually add the powdered sugar and the vanilla extract to the cream cheese. Beat on low speed until the sugar is incorporated, then increase the speed to medium and beat until the mixture is smooth and creamy.
4. Whip the Heavy Cream: In another bowl, pour in the heavy cream. Using a clean electric mixer or a whisk, whip the heavy cream on medium-high speed until stiff peaks form. This process usually takes about 3-5 minutes. The whipped cream should be thick enough to hold its shape but not over-whipped to the point of becoming grainy.
5. Fold the Whipped Cream into the Cream Cheese Mixture: Now, gently fold the whipped cream into the cream cheese mixture using a spatula. Start by adding a small amount of the whipped cream to lighten the cream cheese and then gradually fold in the rest. Take care to maintain the airy texture; gentle folding is key to ensuring your cream layer remains light and fluffy.
With the cream layer complete, you are now ready to move on to the next steps of incorporating the fresh peaches and assembling your Sweet Summer Peach & Cream Icebox Squares. This dessert is shaping up to be a refreshing summer treat that will satisfy your sweet tooth while keeping you cool during those warm summer months. Stay tuned for the next part, where we will dive into making the peach layer and final assembly of this delightful dessert.
{{image_2}}
Preparing the Peach Mixture
To create the perfect Sweet Summer Peach & Cream Icebox Squares, the peach mixture is pivotal. It should strike a delightful balance between sweetness and acidity. Start by selecting ripe, juicy peaches, as their natural sugars will contribute to the sweetness of your mixture. Aim for peaches that yield slightly to pressure, indicating ripeness.
Begin by peeling and pitting the peaches. Dice them into small chunks, about half an inch in size. This will ensure that every bite of your dessert is filled with that luscious peach flavor. In a medium saucepan, combine the diced peaches with a couple of tablespoons of sugar—this will enhance their natural sweetness. Add a squeeze of lemon juice to introduce acidity, which will elevate the flavor profile and prevent the peaches from browning.
Next, sprinkle in one to two tablespoons of cornstarch. This ingredient serves a dual purpose: it thickens the peach mixture and helps create a visually appealing, cohesive filling that holds together when served. As the mixture heats, the cornstarch activates and will give your dessert the perfect texture. Cook over medium heat, stirring gently until the mixture begins to bubble and thicken, approximately 5-7 minutes. Once thickened, remove it from the heat and let it cool while you prepare the layers of your icebox squares.
Tips for Selecting and Preparing the Peaches
When choosing peaches, look for the following qualities:
– Color: A deep golden-yellow hue signals ripeness. Avoid peaches that are overly green or have dull skin.
– Texture: Ripe peaches should be slightly soft, but not mushy. Firm peaches can be left at room temperature for a couple of days to ripen.
– Smell: A sweet, fragrant aroma is a good indicator of ripeness. If they don’t smell like peaches, they may not be flavorful.
To prepare the peaches, wash them under cold water to remove any residues or wax. Use a sharp knife to slice around the pit and twist to separate the halves. After removing the pit, peel the skin if desired. The skin can add texture, but for a smoother filling, peeling is recommended.
Assembling the Icebox Squares
Now, let’s get to the fun part: assembling your Sweet Summer Peach & Cream Icebox Squares. Start by preparing the crust, which you should have ready from the previous steps. If you haven’t done so yet, crush your graham crackers finely in a food processor or by hand, then mix them with melted butter and sugar to create a crumbly base.
Step-by-Step Instructions for Layering
1. Layer the Crust: Press the graham cracker mixture firmly into the bottom of a square baking dish (8×8 or 9×9 inches works well). Make sure to pack it down evenly to form a solid base.
2. Add the Cream Layer: In a separate bowl, whip together cream cheese and powdered sugar until smooth. Fold in whipped cream gently to keep it airy. Spread this mixture over the crust, ensuring an even layer that reaches the edges.
3. Top with Peach Mixture: Once the peach mixture has cooled to room temperature, carefully spoon it over the cream layer. Spread it out evenly, but be gentle to maintain the integrity of the cream layer beneath.
4. Refrigerate: Cover the baking dish with plastic wrap or aluminum foil and place it in the refrigerator. This step is crucial for setting the layers and allowing the flavors to meld together. Chill for at least 4 hours, but overnight is ideal for maximum flavor and firmness.
5. Cut and Serve: Once set, use a sharp knife to cut the dessert into squares. To get clean slices, dip the knife in warm water and wipe it dry between cuts.
Importance of Refrigeration
Refrigeration not only helps the layers firm up but also enhances the flavors. The cooling process allows the cream and peach layers to integrate and develop a harmonious taste that is refreshing and light.
Suggestions for Covering and Storing
If you plan to store the dessert before serving, ensure it is well-covered to prevent it from absorbing any odors from the refrigerator. Plastic wrap or a tightly sealed container will do the trick. The icebox squares can be stored in the refrigerator for up to 3-4 days, but are best enjoyed within the first couple of days for optimal freshness.
Serving Suggestions
Presentation is key when it comes to serving your Sweet Summer Peach & Cream Icebox Squares. Here are some ideas to elevate your dessert:
– Garnish with Fresh Fruits: Top each square with a slice of fresh peach or a handful of blueberries for added color and flavor.
– Drizzle with Sauce: A light drizzle of honey or a peach syrup can add a sweet touch and enhance the overall presentation.
– Add a Whipped Cream Dollop: A small dollop of freshly whipped cream on top of each square adds visual appeal and a creamy texture.
Portion Sizes and Presentation Tips
For gatherings, cut the squares into bite-sized pieces. This allows guests to enjoy smaller portions without feeling overwhelmed. Arrange the squares on a decorative platter and consider adding mint leaves for a pop of color.
Beverage Pairings
The Sweet Summer Peach & Cream Icebox Squares pair beautifully with refreshing beverages. Here are some suggestions:
– Iced Tea: A classic choice, especially when infused with lemon or mint, complements the dessert’s sweetness.
– Lemonade: The tartness of lemonade balances the sweetness of the squares, providing a refreshing contrast.
– Sparkling Water: A light, bubbly drink can cleanse the palate and enhance the dessert experience.
Storage and Shelf Life
To ensure your Sweet Summer Peach & Cream Icebox Squares remain delicious, proper storage is essential. Here are some tips:
– Refrigeration: Store the squares in the refrigerator, covered tightly to avoid drying out or absorbing odors.
– Shelf Life: The dessert can last up to 3-4 days refrigerated, but for the best taste and texture, consume them within the first couple of days.
– Freezing: If you wish to prepare ahead of time, you can freeze the squares. Wrap them tightly in plastic wrap and aluminum foil. When ready to serve, thaw in the refrigerator overnight before cutting and serving.
Conclusion
In summary, the Sweet Summer Peach & Cream Icebox Squares are not only a delightful summer dessert but also a perfect way to celebrate the fresh flavors of ripe peaches. This recipe combines creamy layers with vibrant peach goodness, creating a refreshing treat that is perfect for warm days.
We encourage you to try this recipe, experiment with your own variations, and enjoy the delicious combination of flavors. Homemade desserts like these not only satisfy sweet cravings but also create cherished memories with friends and family. So gather your loved ones, whip up a batch of these icebox squares, and relish the joy of sharing delicious homemade treats!